CKS考试是kubernetes认证系列中中高级的一个证书,相比CKAD和CKA难度略大一些。
一方面虽然CKS跟CKA和CKAD有部分交集,比如k8s的基本使用,RBAC/secret的使用,集群升级等知识点,另一方面又是基于CKA的基础之上,考试也要求先通过CKA。
第二个相对难考的地方在于CKA和CKAD的考点都在kubernetes官网可以找到,但是CKS的很多知识点跳到了外部,涉及到外部的工具,外部的插件等等。
第三个点是CKS的部分知识点需要自己做一定的探索,换句话说不操作一遍的话都不知道他是什么,他涉及到什么知识。
同时,CKAD、CKA、CKS相同的点是都有前人为我们列好了考试大纲,列好了知识点和链接:CKA /CKAD /CKS
这里主要基于第3个难点,对涉及到的操作做一个细致的记录,方便大家参考,减少学习者的探索时间。
由于操作性比较强,所以必然的需要一个可以操作和试验的集群,大家可以根据自己的喜好去搭建,可以去使用在线的云计算平台搭建,阿里云,腾讯云,gcloud等,也可以使用自己的机器去搭建,最少需要两个机器或者两个虚拟机。
我提供一个在树莓派上搭建k8s的详细步骤,参考树莓派搭建k8s集群 。
后面的步骤会基于树莓派上搭建的集群来操作,集群由一个master和一个worker组成。
1
2
3
4
5
~$ kubectl get node NAME STATUS ROLES AGE VERSION server1 Ready control-plane,master 6d22h v1.22.1 server2 Ready <none> 2m3s v1.22.1
ingress controller我们使用ingress-nginx. 在kuberetes官方github账户下存在两个ingress的repo,一个是ingress-gce ,一个是ingress-nginx ,gce是给google cloud专用的,我们当然选择一个通用的ingress-nginx。
ingress-nginx的安装原本是简单的一行指令,但是ingress-nginx的image国内无法访问,需要自己在hub.docker.com搜索别人同步过来的包并替换。
所以安装ingress-nginx的步骤如下
1
2
3
4
5
6
7
8
9
10
11
12
13
14
15
拷贝这里的内容 https://github.com/kubernetes/ingress-nginx/blob/main/deploy/static/provider/baremetal/deploy.yaml 然后把里面 k8s.gcr.io/ingress-nginx/controller:v1.1.0@sha256:f766669fdcf3dc26347ed273a55e754b427eb4411ee075a53f30718b4499076a 替换成 cangyin/ingress-nginx-controller:v1.1.0 把里面的 k8s.gcr.io/ingress-nginx/kube-webhook-certgen:v1.1.1@sha256:64d8c73dca984af206adf9d6d7e46aa550362b1d7a01f3a0a91b20cc67868660 替换成 liangjw/kube-webhook-certgen:v1.1.1 最后kubect apply -f deploy.yaml
当然网络没问题的情况下就直接:
1 kubectl apply -f https://github.com/kubernetes/ingress-nginx/blob/main/deploy/static/provider/baremetal/deploy.yaml
成功后:
1
2
3
4
~$ kl get svc -n ingress-nginx NAME TYPE CLUSTER-IP EXTERNAL-IP PORT(S) AGE ingress-nginx-controller NodePort 10.20.148.137 <none> 80:31724/TCP,443:31447/TCP 20m ingress-nginx-controller-admission ClusterIP 10.20.160.241 <none> 443/TCP 20m
同样,网络不通的情况下metrics server安装时镜像也需要换成hub.docker.com下的包。
1
2
3
4
5
6
7
wget https://github.com/kubernetes-sigs/metrics-server/releases/latest/download/components.yaml 然后编辑components.yaml,在args中添加--kubelet-insecure-tls参数 # https://blog.csdn.net/tanjunchen/article/details/104762428 然后替换image成kubeimages/metrics-server:v0.5.1 再kubectl apply -f components.yaml
成功后:
1
2
3
4
~$ kl get svc -n kube-system NAME TYPE CLUSTER-IP EXTERNAL-IP PORT(S) AGE kube-dns ClusterIP 10.20.0.10 <none> 53/UDP,53/TCP,9153/TCP 8d metrics-server ClusterIP 10.20.204.13 <none> 443/TCP 18m
kube-bench用来检查集群有哪些配置不够安全。
参考文档:
1
2
https://github.com/aquasecurity/kube-bench/blob/main/docs/installation.md https://github.com/aquasecurity/kube-bench/blob/main/docs/running.md
二进制安装:
1
2
3
4
5
6
7
8
9
10
11
# install # 0.6.6开始支持arm了, 所以可以直接装到树莓派上 wget https://github.com/aquasecurity/kube-bench/releases/download/v0.6.6/kube-bench_0.6.6_linux_arm64.deb sudo apt install ./kube-bench_0.6.6_linux_arm64.deb # execute kube-bench --config-dir /etc/kube-bench/cfg --config ./cfg/config.yaml # 这是config默认路径,help 中有 # kube-bench不带参就是检查/etc/kube-bench/cfg/config.yaml。 # -c 1.1.8 可以指定检查哪一项 # 结果可在控制台直接看到
yaml安装:
1
2
3
4
5
6
7
8
9
10
11
git clone https://github.com/aquasecurity/kube-bench.git cd kube-bench # kubectl apply -f job-master.yaml # kubectl apply -f job-worker.yaml kubectl apply -f job.yaml # 检查全部 # 查看结果 ~/kube-bench$ kl get pod -A | grep kube-bench default kube-bench--1-ddvrh 0/1 Completed 0 3m53s ~/kube-bench$ kl logs kube-bench--1-ddvrh ......
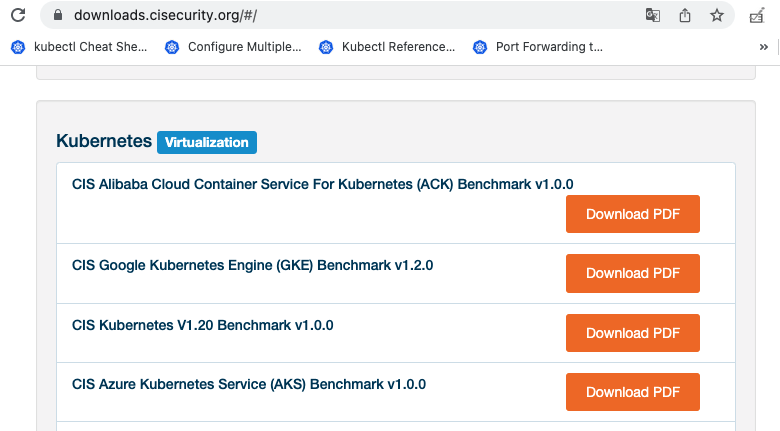
你还需要下载一个pdf文档,这个文档会对每一个检查条目做详细的说明并给出问题的解决方法。
到CIS下载网站 ,定位到Kubernetes相关的下载项,下载"CIS Kubernetes V1.20 Benchmark v1.0.0"(你看到的时候版本可能不一样了)。
基于我前面使用kubeadm安装的集群,下面会列举出kube-bench测出来的一些问题。
1
2
3
chmod 644 /usr/lib/systemd/system/kubelet.service chown root:root /usr/lib/systemd/system/kubelet.service chmod 644 /etc/kubernetes/kubelet.conf
1
2
chmod 644 /etc/cni/net.d/10-weave.conflist chown root:root /etc/cni/net.d/10-weave.conflist
1
2
useradd etcd chown etcd:etcd /var/lib/etcd
1
2
3
4
5
6
7
8
9
10
11
12
13
vi /var/lib/kubelet/config.yaml # ensure anonymous is false # ensure clientCAFile is configured apiVersion: kubelet.config.k8s.io/v1beta1 authentication: anonymous: enabled: false webhook: cacheTTL: 0s enabled: true x509: clientCAFile: /etc/kubernetes/pki/ca.crt
注意上面的配置是kubeadm安装后默认的配置,没有什么问题。其中关于webhook的知识可以参考:
1
2
3
https://kubernetes.io/docs/reference/access-authn-authz/webhook/ mode Webhook causes Kubernetes to query an outside REST service when determining user privileges. 也就是webhook会触发一个rest请求到外部服务来决定一个请求是否有权限。
protectKernelDefaults是决定k8s一个行为,当内核参数不满足k8s的期待的时候,k8s是报错还是修改内核参数。如果true就是报错,如果false就是修改。
1
2
3
4
5
6
7
protectKernelDefaults, if true, causes the Kubelet to error if kernel flags are not as it expects. Otherwise the Kubelet will attempt to modify kernel flags to match its expectation. 配置方法是 vi /var/lib/kubelet/config.yaml 并添加protectKernelDefaults: true 默认是false
k8s因为该参数启动失败报错的一个例子:
1
2
3
4
5
https://www.ibm.com/docs/zh/cloud-private/3.1.2?topic=upgrade-kubelet-container-fails-start kubelet的protectKernelDefaults可能导致kubelet启动失败,错误信息类似: hyperkube[804]: F1023 17:02:19.964867 804 kubelet.go:1333] Failed to start ContainerManager [Invalid kernel flag: vm/overcommit_memory, expected value: 1, actual value: 0, Invalid kernel flag: kernel/panic, expected value: 10, actual value: 0, Invalid kernel flag: kernel/panic_on_oops, expected value: 1, actual value: 0]
在我的集群中如果开启了就会报错。
这两个参数是对kubelet产生的event进行流控的(event会上报给apiserver),eventRecordQPS是控制qps,eventBurst是控制令牌桶的桶大小。设小了会丢event,设大了对apiserver可能产生潜在压力,对于我们个人搭建的小集群,设大一点就可以了。
1
2
3
4
5
6
7
https://kubernetes.io/docs/reference/config-api/kubelet-config.v1beta1/ vi /var/lib/kubelet/config.yaml # add below two lines eventRecordQPS: 100 eventBurst: 200
设置为true时候,如果一个请求没被别的验证流程拦截,那么这个请求就作为一个匿名请求,比如你不提供token的时候(不同于提供错误的token)。匿名请求的用户名和组分别为 system:anonymous和system:unauthenticated.
1
2
3
4
5
6
7
8
9
10
11
12
https://kubernetes.io/docs/reference/access-authn-authz/authentication/#anonymous-requests /etc/kubernetes/manifests/kube-apiserver.yaml 中添加参数 --anonymous-auth=false 但设为true不是必须的,设置了会影响health check。 If you are using RBAC authorization, it is generally considered reasonable to allow anonymous access to the API Server for health checks and discovery purposes, and hence this recommendation is not scored. However, you should consider whether anonymous discovery is an acceptable risk for your purposes. 设为false可能会引起问题: https://github.com/kubernetes/kubeadm/issues/798#issuecomment-470579937 https://github.com/kubernetes/kubernetes/issues/51076#issuecomment-412846482 so leave anonymous-auth=true(default value) with RBAC is ok.
在默认的时候,apiserver访问kubelet的时候,当然,会走ssl验证,但是只会做单向验证,也就是kubelet会验证apiserver,apiserver不会验证kubelet的身份。kubelet-certificate-authority被设置的时候,apiserver访问kubelet时,apiserver就会验证kubelet的身份,并使用kubelet-certificate-authority配置的CA文件来验证。这里我们使用与集群相同的ca文件(default at /etc/kubernetes/pki/ca.crt)来创建kubelet server的证书:
1
2
3
4
5
6
7
8
9
10
11
12
13
14
15
16
17
18
19
20
21
22
23
24
25
26
27
28
29
30
31
32
33
34
35
36
37
38
39
40
41
42
43
44
45
46
47
48
49
首先给kubelet server2创建证书: >>> 1. 创建csr配置文件 vi kubelet-server2.conf [ req ] default_bits = 2048 prompt = no default_md = sha256 req_extensions = req_ext distinguished_name = dn [ dn ] O = system:nodes CN = system:node:server2 [ req_ext ] subjectAltName = @alt_names [ alt_names ] DNS.1 = server2 IP.1 = 192.168.3.152 [ v3_ext ] authorityKeyIdentifier=keyid,issuer:always basicConstraints=CA:FALSE keyUsage=keyEncipherment,dataEncipherment extendedKeyUsage=serverAuth subjectAltName=@alt_names >>> 2. 创建server证书 # 创建key openssl genrsa -out kubelet-server2.key 2048 # 创建csr openssl req -new -key kubelet-server2.key -out kubelet-server2.csr -config kubelet-server2.conf # 创建crt openssl x509 -req -in kubelet-server2.csr -CA /etc/kubernetes/pki/ca.crt -CAkey /etc/kubernetes/pki/ca.key -CAcreateserial -out kubelet-server2.crt -days 366 -extensions v3_ext -extfile kubelet-server2.conf >>> 3. copy files to server2 scp -P 22 kubelet-server2* root@192.168.3.152:/var/lib/kubelet/pki/ >>> 4. config kubelet config file vi /var/lib/kubelet/config.yaml # add below two # tlsCertFile: /var/lib/kubelet/pki/kubelet-server2.crt # tlsPrivateKeyFile: /var/lib/kubelet/pki/kubelet-server2.key >>> 5. config apiserver command line vi /etc/kubernetes/manifests/kube-apiserver.yaml # add below one # - --kubelet-certificate-authority=/etc/kubernetes/pki/ca.crt
注意上面的流程中既包含apiserver的参数kubelet-certificate-authority,也包含kubelet需要配置的参数tlsCertFile和tlsPrivateKeyFile。
经过验证,如果kubelet使用全新的ca来签名(而不是当前集群使用的CA),然后把全新的这个ca的cert配到apiserver的–kubelet-certificate-authority,这时候apiserver请求kubelet会出现unknown ca的错误,不成功,应该是这个全新ca还没有添加到apiserver的可信ca中。这个方向没有继续探索。
admission-control是apiserver提供的一系列内置的控制插件,可以拦截和修改请求。
eventratelimit是用来控制请求的qps的。
1
2
3
4
5
6
7
8
9
10
11
12
13
14
15
16
17
18
19
20
21
22
23
24
25
26
27
28
29
30
31
32
33
34
35
36
37
38
39
40
41
42
43
44
45
46
47
48
49
50
51
52
https://kubernetes.io/docs/reference/access-authn-authz/admission-controllers/#eventratelimit 总体步骤是: 先创建好配置文件admission-control-config-file.yaml和eventconfig.yaml,然后修改kube-apiserver.yaml # 创建配置文件存放的目录 sudo mkdir /etc/kubernetes/admission/ cd /etc/kubernetes/admission/ # 配置admission-control-config-file.yaml,总的插件配置文件 /etc/kubernetes/admission$ sudo vi admission-control-config-file.yaml apiVersion: apiserver.config.k8s.io/v1 kind: AdmissionConfiguration plugins: - name: EventRateLimit path: eventconfig.yaml # 配置eventconfig.yaml # burst是令牌桶的桶大小,cacheSize是指LRU中最多存放多少个namespace/user的配置值 /etc/kubernetes/admission$ sudo vi eventconfig.yaml apiVersion: eventratelimit.admission.k8s.io/v1alpha1 kind: Configuration limits: - type: Namespace qps: 50 burst: 100 cacheSize: 2000 - type: User qps: 10 burst: 50 cacheSize: 1000 # 配置kube-apiserver.yaml # enable-admission-plugins参数打开EventRateLimit项, # admission-control-config-file参数配置总的插件配置文件 # mount created new directory /etc/kubernetes/manifests$ sudo vi kube-apiserver.yaml # edit two lines - --enable-admission-plugins=NodeRestriction,EventRateLimit - --admission-control-config-file=/etc/kubernetes/admission/admission-control-config-file.yaml # add - mountPath: /etc/kubernetes/admission name: api-admission readOnly: true # add - hostPath: path: /etc/kubernetes/admission type: DirectoryOrCreate name: api-admission
同样是一个admission-control插件,会强制把pod中的imagePullPolicy改成Always,这么做是为了防止没有镜像拉取权限的用户利用已经缓存在本地的镜像来拉起pod。镜像拉取权限可以通过在pod中指定imagePullSecrets 来指定访问registry的用户名密码,如果不配置成Always,那么一个没有registry拉取权限的用户就可能利用缓存的镜像而运行了。
这个插件的逻辑比较简单,就是把imagePullPolicy强制改成Always。
1
2
3
参考文档: https://kubernetes.io/docs/reference/access-authn-authz/admission-controllers/#alwayspullimages https://trstringer.com/kubernetes-alwayspullimages/
同样是一个admission-control插件,开启后会禁止SecurityContext中的部分字段,但并不是禁止securitycontext中的所有字段。开了PodSecurityPolicy插件的话这个就不需要开启。kube-bench对SecurityContextDeny和PodSecurityPolicy只要有一个开了就不会报了,不过PodSecurityPolicy比SecurityContextDeny要复杂很多。
1
2
3
开启后会禁止SecurityContext中的RunAsUser等字段,pod级别的和container级别的都有字段会涉及. 代码在plugin/pkg/admission/securitycontext/scdeny/admission.go // Validate will deny any pod that defines SupplementalGroups, SELinuxOptions, RunAsUser or FSGroup
1 禁止SecirityContex中的一些字段,但是这个PodSecurityContext已经被deprecated了.
1
2
insecure-bind-address, insecure-port, port apiserver这几个参数都已经废除,并且不会再被使用了. 所以这几个参数不用管。
–profiling=false
1
2
3
4
5
6
7
8
这个是关闭pprof页面. 如果需要这个页面就不要关闭,然后通过下面的步骤查看: :~# kubectl proxy Starting to serve on 127.0.0.1:8001 :~# wget http://127.0.0.1:8001/debug/pprof apiserver scheduler controller-manager都可以关闭。
审计功能就是给请求记录日志,不同的请求可以设置不同的日志级别,比如只记录metadata,只记录request,等等。
1
2
3
4
5
6
7
8
9
10
11
12
13
14
15
16
17
18
19
20
21
22
23
24
25
26
27
28
29
30
31
32
33
34
35
36
37
38
39
40
参考: https://kubernetes.io/docs/tasks/debug-application-cluster/audit/ > >> 1. 创建audit-policy.yaml vi /etc/kubernetes/audit-policy.yaml # 简单版的policy # Log all requests at the Metadata level. apiVersion: audit.k8s.io/v1 kind: Policy rules: - level: Metadata > >> 2. 配置apiserver参数 - --audit-policy-file=/etc/kubernetes/audit-policy.yaml - --audit-log-path=/var/log/kubernetes/audit/audit.log - --audit-log-maxage=15 - --audit-log-maxbackup=10 - --audit-log-maxsize=10 > >> 3. 挂载相关文件和目录 # volumeMounts: - mountPath: /etc/kubernetes/audit-policy.yaml name: audit-policy readOnly: true - mountPath: /var/log/kubernetes/audit name: audit-log readOnly: false # volumes: - hostPath: path: /etc/kubernetes/audit-policy.yaml type: File name: audit-policy - hostPath: path: /var/log/kubernetes/audit type: DirectoryOrCreate name: audit-log
之后你在/var/log/kubernetes/audit/audit.log文件中就能看到apiserver的请求日志了。
对写入etcd的数据进行编码,对读取的数据进行解码,这样用户直接读etcd的数据就会是乱码。
1
2
3
4
5
6
7
8
9
10
11
12
13
14
15
16
17
18
19
20
21
22
23
24
25
参考: https://kubernetes.io/docs/tasks/administer-cluster/encrypt-data/ 因为我们在”admission-control EventRateLimit“小节已经挂载了/etc/kubernetes/admission目录,所以这里不再配置挂载/etc/kubernetes/admission的操作。 编辑encrypt-config.yaml文件: vi /etc/kubernetes/admission/encrypt-config.yaml apiVersion: apiserver.config.k8s.io/v1 kind: EncryptionConfiguration resources: - resources: - secrets providers: - aescbc: keys: - name: key1 secret: <BASE 64 ENCODED SECRET> - identity: {} 其中secret通过 head -c 32 /dev/urandom | base64 获取。集群内用来HA的多个apiserver要用同一个secret。 然后通过--encryption-provider-config参数传给apiserver。 --encryption-provider-config=/etc/kubernetes/admission/encrypt-config.yaml
注意providers下的项目中,第一个provider的项用于加密,所有providers项用于依次解密。在我们的配置中key1用于加密,解密会先用key1解,解不出就用第二项解,第二项是空的,也就是原样返回。通常providers最后一项配为空,这样就可以防止在encrypt-config.yaml应用前存入的不加密数据会读不出来。
我们可以验证一下EncryptionConfiguration的功能:
1
2
3
4
5
6
7
8
9
10
11
12
13
14
15
16
17
18
19
20
21
22
# 首先创建一个读etcd的脚本,方便操作: vi read_etcd_resource.sh # $1 resource # $2 namespace # $3 resource name ETCDCTL_API=3 etcdctl --endpoints 127.0.0.1:2379 \ --cert=/etc/kubernetes/pki/etcd/server.crt \ --key=/etc/kubernetes/pki/etcd/server.key \ --cacert=/etc/kubernetes/pki/etcd/ca.crt \ get /registry/$1/$2/$3 # 验证encrypt的方法: kubectl get secret # 选择一个encrypt-config.yaml应用前已经存在的secre,比如tdefault-token-xxxxx sh etcd_read.sh secrets default default-token-xxxxx # 返回可读明文。 # 创建一个新的secret kubectl create secret generic xx --from-literal aa==bb # 读取先的secret sh etcd_read.sh secrets default xx # 返回乱码,证明新建的secret已经被encode了
设置tls支持的加密算法,由于部分加密算法是不安全的,所以我们需要把支持的加密算法枚举出来,不安全的不枚举就不会被使用。枚举出的算法名配到tls-cipher-suites即可。
1
2
3
4
5
6
7
8
9
10
11
参考: https://kubernetes.io/docs/reference/command-line-tools-reference/kube-apiserver/ --tls-cipher-suites strings Comma-separated list of cipher suites for the server. If omitted, the default Go cipher suites will be used. 有部分算法是不够安全的。不传的话是使用的默认算法列表,取决于tls内部,默认值不是k8s指定的。 上面kubernetes文档里有给出建议的选项(要删掉空格)。 Comma-separated list of cipher suites for the server. If omitted, the default Go cipher suites will be used. Preferred values: TLS_AES_128_GCM_SHA256, TLS_AES_256_GCM_SHA384, TLS_CHACHA20_POLY1305_SHA256, TLS_ECDHE_ECDSA_WITH_AES_128_CBC_SHA, TLS_ECDHE_ECDSA_WITH_AES_128_GCM_SHA256, TLS_ECDHE_ECDSA_WITH_AES_256_CBC_SHA, TLS_ECDHE_ECDSA_WITH_AES_256_GCM_SHA384, TLS_ECDHE_ECDSA_WITH_CHACHA20_POLY1305, TLS_ECDHE_ECDSA_WITH_CHACHA20_POLY1305_SHA256, TLS_ECDHE_RSA_WITH_AES_128_CBC_SHA, TLS_ECDHE_RSA_WITH_AES_128_GCM_SHA256, TLS_ECDHE_RSA_WITH_AES_256_CBC_SHA, TLS_ECDHE_RSA_WITH_AES_256_GCM_SHA384, TLS_ECDHE_RSA_WITH_CHACHA20_POLY1305, TLS_ECDHE_RSA_WITH_CHACHA20_POLY1305_SHA256, TLS_RSA_WITH_AES_128_CBC_SHA, TLS_RSA_WITH_AES_128_GCM_SHA256, TLS_RSA_WITH_AES_256_CBC_SHA, TLS_RSA_WITH_AES_256_GCM_SHA384. Insecure values: TLS_ECDHE_ECDSA_WITH_AES_128_CBC_SHA256, TLS_ECDHE_ECDSA_WITH_RC4_128_SHA, TLS_ECDHE_RSA_WITH_3DES_EDE_CBC_SHA, TLS_ECDHE_RSA_WITH_AES_128_CBC_SHA256, TLS_ECDHE_RSA_WITH_RC4_128_SHA, TLS_RSA_WITH_3DES_EDE_CBC_SHA, TLS_RSA_WITH_AES_128_CBC_SHA256, TLS_RSA_WITH_RC4_128_SHA.
1
2
3
4
5
6
7
8
文档: https://kubernetes.io/docs/reference/command-line-tools-reference/kube-apiserver/ --request-timeout表示apiserver可以维持一个链接直到超时的时间。 比如--request-timeout=300s。 还有个--min-request-timeout,专用于watch request handler的超时时间, 实际超时时间是在min-request-timeout之上加一个随机值。
已经结束的pod(succeed和failed)不会自动删除,直到某个控制器删除或者手动删除。
–terminated-pod-gc-threshold配置后,当超过配置值数量pod结束后,就会触发清理,超过几个就清理几个。
1
2
3
4
5
6
文档: https://kubernetes.io/docs/concepts/workloads/pods/pod-lifecycle/#pod-garbage-collection 代码在pkg/controller/podgc/gc_controller.go 的 func (gcc *PodGCController) gcTerminated(pods []*v1.Pod) The control plane cleans up terminated Pods (with a phase of Succeeded or Failed), when the number of Pods exceeds the configured threshold (determined by terminated-pod-gc-threshold in the kube-controller-manager).
在apiserver中我们已经禁用了apiserver的profiling,那么相应的controller manager的profiling也应该被禁用掉。给controller manager配置命令行参数–profiling=false即可。
不过这里要补充一个知识,如何在controller manager的profiling打开的情况下,查看pprof页面。思路是在请求中带上TOKEN,并且给token对应的用户一个对应的权限。
1
2
3
4
5
6
7
8
9
10
11
12
# get default user token kubectl describe secret $(kubectl get secrets -n default | grep ^default | cut -f1 -d ' ') -n default | grep -E '^token' | cut -f2 -d':' | tr -d " " # set token var TOKEN=xxx # 上一条命令的内容 # apply clusterrolebinding kl apply -f role.yaml # 访问带上token curl https://127.0.0.1:10257/debug/pprof/goroutine?debug=2 -k --header "Authorization: Bearer $TOKEN" curl https://127.0.0.1:10259/debug/pprof/goroutine?debug=2 -k --header "Authorization: Bearer $TOKEN"
1
2
3
4
5
6
7
8
9
10
11
12
13
14
15
16
17
18
19
20
21
22
23
24
25
26
27
# 其中role.yaml内容如下: cat role.yaml apiVersion: rbac.authorization.k8s.io/v1 kind: ClusterRole metadata: name: debug-cluster-role rules: - nonResourceURLs: - /debug/pprof/profile - /debug/pprof/goroutine verbs: - get --- apiVersion: rbac.authorization.k8s.io/v1 kind: ClusterRoleBinding metadata: name: debug-binding roleRef: apiGroup: rbac.authorization.k8s.io kind: ClusterRole name: debug-cluster-role subjects: - kind: ServiceAccount name: default namespace: default
同apiserver和controll manager,配置命令行参数–profiling=false即可。
我们创建pod的时候会自动挂载一个user,默认就是default,这个用户的token会挂载在/var/run/secrets/kubernetes.io/serviceaccount/token下,但是出于安全考虑,我们希望不要被自动挂载。
pod和service account都可以设置automountServiceAccountToken这个字段,都设置了的话pod中的automountServiceAccountToken字段优先。
1
2
3
4
5
6
7
8
9
10
11
12
13
14
15
16
17
https://kubernetes.io/docs/tasks/configure-pod-container/configure-service-account/#use-the-default-service-account-to-access-the-api-server # sa中配置 apiVersion: v1 kind: ServiceAccount metadata: name: build-robot automountServiceAccountToken: false # pod中配置 apiVersion: v1 kind: Pod metadata: name: my-pod spec: serviceAccountName: build-robot automountServiceAccountToken: false
secret可以挂载到env或者volume中,但是由于环境变量容易暴露到日志中,因此secret应该尽量使用volume挂载而不是env。
secret如果有更复杂的管理,或者需要跨k8s或者在非k8s环境下使用,还是需要进行外部管理的。
seccomp是操作系统用来限制进程的syscall的,k8s可以配置seccomp来限制容器中进程的syacall权限,哪些能call哪些不能call。
1
2
3
4
5
6
7
8
9
文档: https://kubernetes.io/blog/2021/08/25/seccomp-default/ https://kubernetes.io/docs/reference/command-line-tools-reference/feature-gates/ 默认情况下k8s传给cri的seccomp是Unconfined,即不限制syscall。 设置SeccompDefault后,会使用cri默认的seccomp,不同cri可能默认是不同的。 If not specified differently in the pod manifest, then the feature will add a higher set of security constraints by using the default profile of the container runtime. These profiles may differ between runtimes like CRI-O or containerd. They also differ for its used hardware architectures
我们使用下面的步骤也验证seccomp default生效了。
1
2
3
4
5
6
7
8
9
10
11
12
13
14
15
16
17
18
19
20
21
22
23
24
25
26
27
28
29
# 获取目前的seccomp kl run ng --image nginx --restart=Never CONTAINER_ID=$(sudo crictl --runtime-endpoint=/run/containerd/containerd.sock ps -q --name=ng) sudo crictl --runtime-endpoint=/run/containerd/containerd.sock inspect $CONTAINER_ID | jq .info.runtimeSpec.linux.seccomp # 返回null # 配置seccomp default root@k8sserver2:~# vi /etc/default/kubelet KUBELET_EXTRA_ARGS="--feature-gates='SeccompDefault=true' --seccomp-default=RuntimeDefault" systemctl daemon-reload systemctl restart kubelet # 获取新的seccomp kl run gn --image nginx --restart=Never CONTAINER_ID=$(sudo crictl --runtime-endpoint=/run/containerd/containerd.sock ps -q --name=gn) sudo crictl --runtime-endpoint=/run/containerd/containerd.sock inspect $CONTAINER_ID | jq .info.runtimeSpec.linux.seccomp # 返回 #{ # "defaultAction": "SCMP_ACT_ERRNO", # "architectures": [ # "SCMP_ARCH_ARM", # "SCMP_ARCH_AARCH64" # ], # "syscalls": [ # { # "names": [ # "accept", # "accept4", # ......
上面看了如何使用默认的seccomp,那么如果使用自定义的seccomp呢,可以看下面的步骤:
1
2
3
4
5
6
7
8
9
10
11
12
13
14
15
16
17
18
19
20
21
22
23
24
25
26
27
28
29
30
31
32
33
34
35
36
37
38
39
40
41
42
43
44
45
46
47
48
49
文档: https://kubernetes.io/docs/tutorials/clusters/seccomp/ # 创建/var/lib/kubelet/seccomp,这个是seccomp文件默认被查找的位置 mkdir /var/lib/kubelet/seccomp cd /var/lib/kubelet/seccomp # 下载所需的seccomp文件,我们这个seccomp的作用的对syscall进行日志记录,不做syscall拦截 curl -L -o profiles/audit.json https://k8s.io/examples/pods/security/seccomp/profiles/audit.json #curl -L -o profiles/violation.json https://k8s.io/examples/pods/security/seccomp/profiles/violation.json #curl -L -o profiles/fine-grained.json https://k8s.io/examples/pods/security/seccomp/profiles/fine-grained.json ls profiles # audit.json fine-grained.json violation.json # 创建pod的yaml,里面包含自定义seccom配置localhostProfile: profiles/audit.json vi audit-log.yaml apiVersion: v1 kind: Pod metadata: name: audit-pod labels: app: audit-pod spec: securityContext: seccompProfile: type: Localhost localhostProfile: profiles/audit.json containers: - name: test-container image: nginx # 查看pod的ip:port kubectl apply -f audit-log.yaml kubectl expose pod audit-pod --type NodePort --port 80 kubectl get service audit-pod NAME TYPE CLUSTER-IP EXTERNAL-IP PORT(S) AGE audit-pod NodePort 10.20.162.9 <none> 80:31676/TCP 7s # 访问ip:port并查看日志 访问ip:port curl 10.20.162.9 同时在另一个终端查看日志 tail -f /var/log/syslog 可以看到这些日志: Dec 26 11:45:54 k8sserver2 kernel: [57795.753820] kauditd_printk_skb: 6 callbacks suppressed Dec 26 11:45:54 k8sserver2 kernel: [57795.753832] audit: type=1326 audit(1640519154.116:2520): auid=4294967295 uid=101 gid=101 ses=4294967295 subj=cri-containerd.apparmor.d pid=21257 comm="nginx" exe="/usr/sbin/nginx" sig=0 arch=c00000b7 syscall=242 compat=0 ip=0xffffb7021d14 code=0x7ffc0000 ...... 经过验证如果拿掉pod中seccompProfile配置,就不能看到日志。说明seccomp生效了。
这部分知识比较偏向攻击层面,而不是防守层面。我们是通过学习他的攻击方式来加强自己在配置权限时候的安全意识。同时实际考试中并没有这一块考到,所以不想看的可以跳过。
存在权限风险的操作主要有4个:bind,escalate,impersonate,create pod。详细的分析和测试可以跳到k8s中的危险权限 查看。
psp是给pod增加约束的,定义哪些能做,作用范围大都是在securityContext这个结构中,其他也有,比如可以定义哪些volume是支持的,定义哪些端口是允许的。他通过限制这些结构来达到约束pod的目的。
但是psp是一个即将被废弃的功能,如果你看到文章的时候k8s的版本已经出到了v1.25了那么你可以不用看这部分了,根据官方文档,psp会在v1.25被彻底拿掉。至于psp的继任者Pod Security Admission 我会在后续补上,当前我安装的k8s版本还不能使用,要v1.22才能使用。
详细的关于psp的解说和用法可以跳到k8s中的PodSecurityPolicy 查看。
1
2
3
4
5
6
7
8
https://kubernetes.io/docs/tasks/tls/managing-tls-in-a-cluster/ https://kubernetes.io/docs/reference/access-authn-authz/certificate-signing-requests/#signers https://kubernetes.io/docs/reference/access-authn-authz/certificate-signing-requests/#normal-user 使用approve流程是因为集群的CA证书不应该随便拿来用,需要隐藏起来。 这个流程是controller manager完成证书签发的流程,controller manager使用这两个参数来配置用到的ca的key和cert: - --cluster-signing-cert-file=/etc/kubernetes/pki/ca.crt - --cluster-signing-key-file=/etc/kubernetes/pki/ca.key
csr approve的步骤如下:
1
2
3
4
5
6
7
8
9
10
11
12
13
14
15
16
17
18
19
20
21
22
23
24
25
26
27
28
29
30
31
32
33
34
35
36
37
38
39
40
41
42
43
44
45
46
47
48
49
50
51
52
53
54
55
56
57
58
59
60
61
62
63
64
65
66
67
68
69
70
71
72
73
74
75
76
# 1.创建key ubuntu@server2:~$ openssl genrsa -out myuser.key 2048 Generating RSA private key, 2048 bit long modulus (2 primes) ..............+++++ ..+++++ e is 65537 (0x010001) # 2.创建csr # 这一步是交互形式的,你需要填的是Organization Name和Common Name,对应的是user的group和username,其他字段都可以不填,直接回车。这里我填的分别是system:groupx和yizhiren,你可以按需填。 ubuntu@server2:~$ openssl req -new -key myuser.key -out myuser.csr You are about to be asked to enter information that will be incorporated into your certificate request. What you are about to enter is what is called a Distinguished Name or a DN. There are quite a few fields but you can leave some blank For some fields there will be a default value, If you enter '.', the field will be left blank. ----- Country Name (2 letter code) [AU]: State or Province Name (full name) [Some-State]: Locality Name (eg, city) []: Organization Name (eg, company) [Internet Widgits Pty Ltd]:system:groupx Organizational Unit Name (eg, section) []: Common Name (e.g. server FQDN or YOUR name) []:yizhiren Email Address []: Please enter the following 'extra' attributes to be sent with your certificate request A challenge password []: An optional company name []: # 可以使用下面的命令查看生成的csr文件 # openssl req -noout -text -in ./myuser.csr # Certificate Request: # ...... # 3. base64 myuser.csr ubuntu@server2:~$ cat myuser.csr | base64 | tr -d "\n" xxxxxxxxxxxxxxxxxx # 4. 创建csr yaml文件 vi csr.yaml # 这里的request就是上面base64 myuser.csr值 apiVersion: certificates.k8s.io/v1 kind: CertificateSigningRequest metadata: name: myuser spec: request: xxxxxxxxxxxxxxxxxx signerName: kubernetes.io/kube-apiserver-client expirationSeconds: 86400 # one day usages: - client auth # 5. apply yaml ubuntu@server2:~$ kl apply -f csr.yaml certificatesigningrequest.certificates.k8s.io/myuser created # 6. 查看csr ubuntu@server2:~$ kl get csr NAME AGE SIGNERNAME REQUESTOR REQUESTEDDURATION CONDITION myuser 5m47s kubernetes.io/kube-apiserver-client kubernetes-admin 24h Pending # 7. approve csr ubuntu@server2:~$ kl certificate approve myuser certificatesigningrequest.certificates.k8s.io/myuser approved # 8. save crt kl get csr myuser -o jsonpath='{.status.certificate}'| base64 -d > myuser.crt # 可以使用下面的命令查看生成的crt文件 # openssl x509 -noout -text -in ./myuser.crt # Certificate: # ......
ingress是对内部服务的代理,外部请求通过ingress再转发到svr中。
我们做一个使用举例:
1
2
3
4
5
6
7
8
9
10
11
12
13
14
15
16
17
18
19
20
21
# 首先创建3个svc: ubuntu@server2:~$ kl run ng1 --image nginx pod/ng1 created ubuntu@server2:~$ kl run ng2 --image nginx pod/ng2 created ubuntu@server2:~$ kl run ngdefault --image nginx pod/ngdefault created ubuntu@server2:~$ kl expose pod ng1 --name svr1 --port 80 --target-port 80 service/svr1 exposed ubuntu@server2:~$ kl expose pod ng2 --name svr2 --port 80 --target-port 80 service/svr2 exposed ubuntu@server2:~$ kl expose pod ngdefault --name svrdefault --port 80 --target-port 80 service/svrdefault exposed ubuntu@server2:~$ kl get svc NAME TYPE CLUSTER-IP EXTERNAL-IP PORT(S) AGE kubernetes ClusterIP 10.20.0.1 <none> 443/TCP 12d svr1 ClusterIP 10.20.22.214 <none> 80/TCP 88s svr2 ClusterIP 10.20.191.98 <none> 80/TCP 81s svrdefault ClusterIP 10.20.215.248 <none> 80/TCP 55s
1
2
3
4
5
6
7
8
9
10
11
12
13
14
15
16
17
18
19
20
21
22
23
24
25
26
27
28
29
30
31
32
33
34
35
36
37
38
39
40
41
# 然后创建ingress yaml vi ingress.yaml # 注意rewrite-target和ingressClassName的配置 # nginx-controller的安装可在文章靠前的小节中查看。 apiVersion: networking.k8s.io/v1 kind: Ingress metadata: name: simple-fanout-example annotations: nginx.ingress.kubernetes.io/rewrite-target: /$2 spec: ingressClassName: nginx defaultBackend: service: name: ngdefault port: number: 80 rules: - host: jinqidiguo.com http: paths: - path: /svr1(/|$)(.*) pathType: Prefix backend: service: name: svr1 port: number: 80 - path: /svr2(/|$)(.*) pathType: Prefix backend: service: name: svr2 port: number: 80 # 然后apply ~$ kl apply -f ingress.yaml ingress.networking.k8s.io/simple-fanout-example created
然后我们访问svr1和svr2:
1
2
3
4
5
6
7
8
9
10
11
12
13
14
15
16
17
18
19
20
21
22
23
24
25
26
27
28
29
30
# 查看nginx-controller的ip ubuntu@server2:~$ kl get svc ingress-nginx-controller -n ingress-nginx NAME TYPE CLUSTER-IP EXTERNAL-IP PORT(S) AGE ingress-nginx-controller NodePort 10.20.148.137 <none> 80:31724/TCP,443:31447/TCP 4d3h # 访问svr2 ubuntu@server2:~$ curl 10.20.148.137/svr2/index.html -H 'Host: jinqidiguo.com' <!DOCTYPE html> <html> <head> <title>Welcome to nginx!</title> <style> html { color-scheme: light dark; } body { width: 35em; margin: 0 auto; font-family: Tahoma, Verdana, Arial, sans-serif; } </style> </head> <body> <h1>Welcome to nginx!</h1> <p>If you see this page, the nginx web server is successfully installed and working. Further configuration is required.</p> <p>For online documentation and support please refer to <a href="http://nginx.org/">nginx.org</a>.<br/> Commercial support is available at <a href="http://nginx.com/">nginx.com</a>.</p> <p><em>Thank you for using nginx.</em></p> </body> </html>
1
2
3
4
资料: https://docs.microsoft.com/en-us/azure/aks/ingress-own-tls https://kubernetes.io/docs/concepts/services-networking/ingress/#tls https://kubernetes.io/docs/concepts/configuration/secret/#tls-secrets
上小节我们配置了ingress,此时ingress我们发现已经支持https了。但不是我们自己定义的证书。
1
2
3
4
5
6
7
~$ curl https://jinqidiguo.com/svr1 -k -v --resolve jinqidiguo.com:443:10.20.148.137 ... * issuer: O=Acme Co; CN=Kubernetes Ingress Controller Fake Certificate ... <p><em>Thank you for using nginx.</em></p> </body> </html>
但是可以看到这时候的服务端证书是默认的一个证书”Kubernetes Ingress Controller Fake Certificate“。
我们这里需要做的是自定义我们自己的证书。
1
2
3
4
5
6
7
8
9
10
11
12
13
14
15
16
17
18
19
20
21
22
23
24
25
26
27
28
29
30
31
32
33
34
35
36
37
# 首先创建证书,这里使用ca文件直接签。 # 你也可以使用csr流程来签发,参考链接:https://kubernetes.io/docs/tasks/tls/managing-tls-in-a-cluster/ # 创建csr.conf vi ingress-csr.conf [ req ] default_bits = 2048 prompt = no default_md = sha256 req_extensions = req_ext distinguished_name = dn [ dn ] O = ingress-server CN = jinqidiguo.com [ req_ext ] subjectAltName = @alt_names [ alt_names ] DNS.1 = jinqidiguo.com IP.1 = 10.20.148.137 [ v3_ext ] authorityKeyIdentifier=keyid,issuer:always basicConstraints=CA:FALSE keyUsage=keyEncipherment,dataEncipherment extendedKeyUsage=serverAuth subjectAltName=@alt_names # 创建key openssl genrsa -out ingress-server.key 2048 # 创建csr openssl req -new -key ingress-server.key -out ingress-server.csr -config ingress-csr.conf # 创建cert sudo openssl x509 -req -in ingress-server.csr -CA /etc/kubernetes/pki/ca.crt -CAkey /etc/kubernetes/pki/ca.key -CAcreateserial -out ingress-server.crt -days 366 -extensions v3_ext -extfile ingress-csr.conf
我们得到了两个有用的文件ingress-server.crt和ingress-server.key。
然后创建secret,secret中保存我们创建出来的证书和key。
1 kl create secret tls ingress-tls-secret --cert=ingress-server.crt --key=ingress-server.key
然后编辑ingress, 插入secret配置。
1
2
3
4
5
6
7
8
9
10
11
12
13
14
15
16
17
18
19
20
21
22
23
24
25
26
27
28
29
30
31
32
33
34
35
36
37
38
39
40
41
42
~$ vi ingress.yaml # 插入tls字段 apiVersion: networking.k8s.io/v1 kind: Ingress metadata: name: simple-fanout-example annotations: nginx.ingress.kubernetes.io/rewrite-target: /$2 spec: ingressClassName: nginx tls: - hosts: - jinqidiguo.com secretName: ingress-tls-secret defaultBackend: service: name: ngdefault port: number: 80 rules: - host: jinqidiguo.com http: paths: - path: /svr1(/|$)(.*) pathType: Prefix backend: service: name: svr1 port: number: 80 - path: /svr2(/|$)(.*) pathType: Prefix backend: service: name: svr2 port: number: 80 # 然后apply ~$ kl apply -f ingress.yaml ingress.networking.k8s.io/simple-fanout-example configured
然后我们再来测试https访问:
1
2
3
4
5
6
7
~$ curl https://jinqidiguo.com/svr1 -k -v --resolve jinqidiguo.com:443:10.20.148.137 ... * subject: O=ingress-server; CN=jinqidiguo.com ... <p><em>Thank you for using nginx.</em></p> </body> </html>
可以看到证书已经改成我们自己的信息了。
dashboard用来可视化管理集群,这里记录下如何安装并访问dashboard。主要是两个步骤,一个是安装dasshboard,一个是创建一个用户专门来访问dashboard。
1
2
3
4
5
6
7
8
9
10
11
12
13
14
15
16
17
18
19
20
21
22
23
24
25
26
27
28
29
30
31
32
33
34
35
36
37
# 文档 https://kubernetes.io/docs/tasks/access-application-cluster/web-ui-dashboard/#deploying-the-dashboard-ui https://github.com/kubernetes/dashboard/blob/master/docs/user/access-control/creating-sample-user.md # deploy dashboard kubectl apply -f https://raw.githubusercontent.com/kubernetes/dashboard/v2.4.0/aio/deploy/recommended.yaml # create user vi dashboard-user.yaml apiVersion: v1 kind: ServiceAccount metadata: name: dashboard-admin-user namespace: kubernetes-dashboard --- apiVersion: rbac.authorization.k8s.io/v1 kind: ClusterRoleBinding metadata: name: dashboard-admin-user roleRef: apiGroup: rbac.authorization.k8s.io kind: ClusterRole name: cluster-admin subjects: - kind: ServiceAccount name: dashboard-admin-user namespace: kubernetes-dashboard kl apply -f dashboard-user.yaml # get token from secret from serviceaccount kubectl -n kubernetes-dashboard get secret $(kubectl -n kubernetes-dashboard get sa/dashboard-admin-user -o jsonpath="{.secrets[0].name}") -o go-template="{{.data.token | base64decode}}" # visit kubectl proxy http://localhost:8001/api/v1/namespaces/kubernetes-dashboard/services/https:kubernetes-dashboard:/proxy/ # copy token to the page to login
注意考试中有考到修改dashboard参数的,可以参考页面:
1 https://github.com/kubernetes/dashboard/blob/36e967d848006dee386355c26f392f9045bc8f3d/docs/common/dashboard-arguments.md
为了确认已经安装的或者即将安装的二进制文件是官方提供的,我们需要检查二进制文件的摘要信息。
1
2
3
4
5
6
7
8
9
10
11
12
13
14
15
16
17
18
19
goto https://github.com/kubernetes/kubernetes/tree/master/CHANGELOG to visit change log of your k8s version 然后下载指定版本的包,然后检查官方包的bin的shasum值 bin % shasum kubelet 97d45554c6451b9d6b17c51704ef87d3bd0abd3c kubelet bin % shasum kubectl 6ab51e83360217648c863d1f78871af806d943d5 kubectl bin % shasum kubeadm dd59c05cf549a446e3aa1e56178be110670319bd kubeadm 然后检查server中安装的bin的shasum server2:~# shasum /usr/bin/kubelet 97d45554c6451b9d6b17c51704ef87d3bd0abd3c /usr/bin/kubelet server2:~# shasum /usr/bin/kubectl 6ab51e83360217648c863d1f78871af806d943d5 /usr/bin/kubectl server2:~# shasum /usr/bin/kubeadm dd59c05cf549a446e3aa1e56178be110670319bd /usr/bin/kubeadm
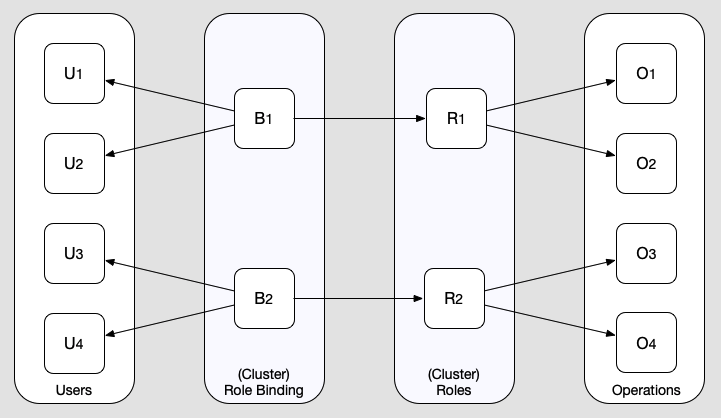
rbac是k8s内部的权限管理机制,他主要有4中角色组成,user代表用户,operation代表操作行为,role代表一组operation的集合,binding关联一组user和一个role。从user到binding再到role再到operation,凡是这条线能关联上的就代表user拥有这个operation的权限。
图片来自Kubernetes Role-based Authorization
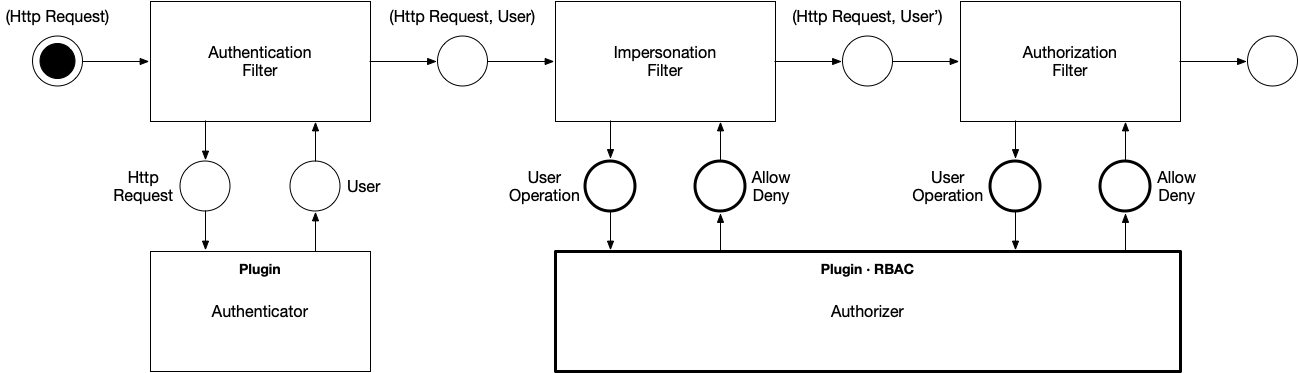
RBAC起作用的阶段是在认证(Authentication)之后, 在授权(Authorization)阶段起作用。
图片来自Inside Kubernetes RBAC
那RBAC需要学些什么呢,事实上RBAC这部分知识是跟CKA考试重叠的,我们需要注意的是在分配权限的时候要注意收缩权限,按照最小权限的原则去分配权限。
1
2
3
4
5
另外列一些RBAC相关的很好的网站(不看不影响考试): https://rbac.dev/ # 这个网站很棒,收集了大量rbac的好文章 https://dominik-tornow.medium.com/inside-kubernetes-rbac-9988b08a738a https://www.cyberark.com/resources/threat-research-blog/securing-kubernetes-clusters-by-eliminating-risky-permissions
OPA是用来替代PSP的一个方案,OPA也称作Gatekeeper v1.0。
OPA的使用太过繁琐了,需要好多手工活。不建议学习了,考试考到的也是基于OPA的GateKeeper v3.0,所以我们可以直接学Gatekeeper v3.0.
如果实在想亲手尝试,可以联系我,我可以贴上来yaml和步骤,或者照着这个文档走:
1 https://www.openpolicyagent.org/docs/latest/kubernetes-tutorial/
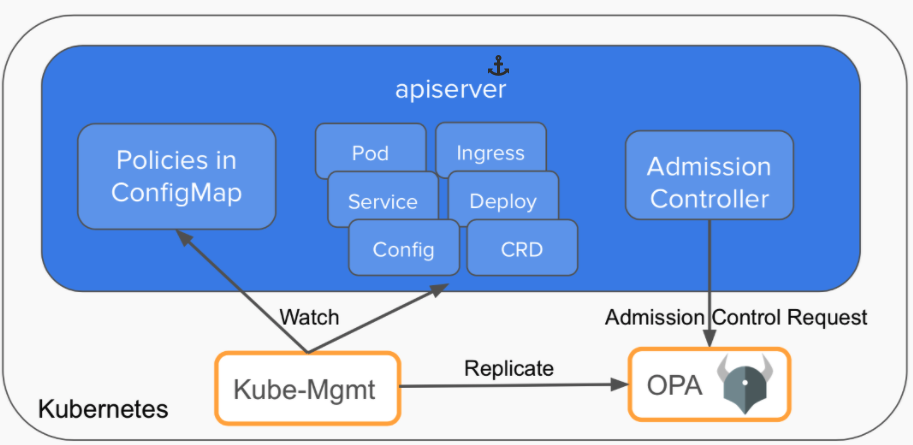
gatekeeper经历了3个版本,版本一就是步骤繁琐的原始OPA方案:
这个版本中,opa和kube-mgmt是作为两个container,部署在同一个pod中。其中mgmt用来拉取所需的resource给opa, 并watch apiserver以便第一时间拉取更新的resource。opa则拉取bundle,bundle中包含rego语言定义的规则。这个版本最繁琐的就是你得自己创建svc(http就可以)来提供bundle的拉取服务,另外我们还得自己注册webhook,为了webhook的安全访问,我们还得为opa签发一个证书。
gatekeeper的版本二我们就不看了,版本三是目前最新的一个版本:
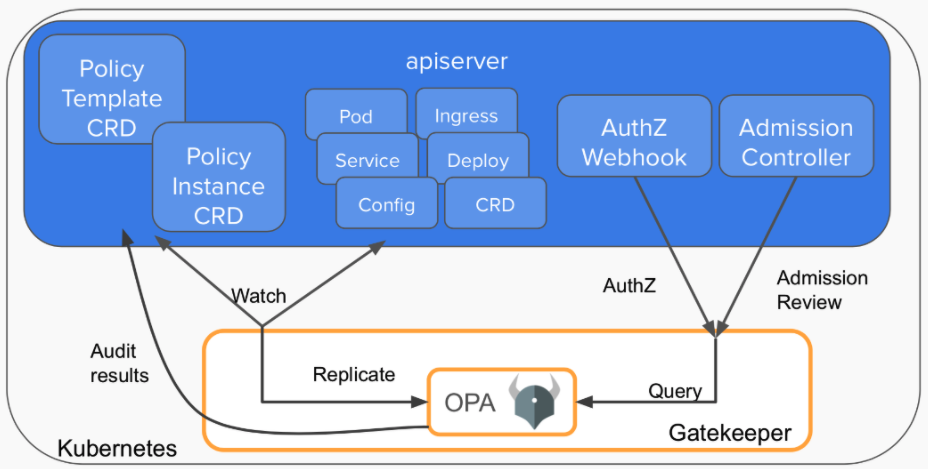
gatekeeper v3是在opa外部包了一层,不再使用mgmt。所以gatekeeper自己要做这么几件事:
1
2
3
4
5
一个是原来mgmt的工作,watch并拉取resources; 一个是新增两类CRD,一类是模板CRD(即ConstraintTemplate),定义了规则,另一类是参数CRD(即Constraint),这个CRD定义了规则的参数; 一个是作为apiserver和opa之间的桥梁,gatekeeper和opa是运行在同一个进程的,opa作为一个库集成;gatekeeper对opa的包含关系是gatekeeper(opaframework(opa(rego()))) 。
gatekeeper内部存储了所有的模板CRD和参数CRD,同时gatekeeper自己注册为webhook, 然后根据apiserver传过来的对象执行OPA的Query操作,query操作会拿出所有的模板CRD和参数CRD,触发模板CRD中的rego定义中的violation进行一一检查。
另外gatekeeper还具有审计功能,能检查全部相关resource(包括在应用gatekeeper之前的)是否符合约束。 违反约束的都在参数crd的.status.violations字段下。
用法如下,我们创建一个namespace的约束,要求namespace必须具有owner和usage两个lables:
1
2
3
4
5
6
7
# install ~$ kl apply -f https://raw.githubusercontent.com/open-policy-agent/gatekeeper/release-3.7/deploy/gatekeeper.yaml namespace/gatekeeper-system created resourcequota/gatekeeper-critical-pods created customresourcedefinition.apiextensions.k8s.io/assign.mutations.gatekeeper.sh created ......
1
2
3
4
5
6
7
8
9
10
11
12
13
14
15
16
17
18
19
20
21
22
23
24
25
26
27
28
29
30
31
32
33
34
# apply 模板CRD ~$ vi ConstraintTemplate.yaml apiVersion: templates.gatekeeper.sh/v1beta1 kind: ConstraintTemplate metadata: name: k8srequiredlabels spec: crd: spec: names: kind: K8sRequiredLabels validation: # Schema for the `parameters` field openAPIV3Schema: properties: labels: type: array items: string targets: - target: admission.k8s.gatekeeper.sh rego: | package k8srequiredlabels violation[{"msg": msg, "details": {"missing_labels": missing}}] { provided := {label | input.review.object.metadata.labels[label]} required := {label | label := input.parameters.labels[_]} missing := required - provided count(missing) > 0 msg := sprintf("you must provide labels: %v", [missing]) } ~$ kl apply -f ConstraintTemplate.yaml constrainttemplate.templates.gatekeeper.sh/k8srequiredlabels created
1
2
3
4
5
6
7
8
9
10
11
12
13
14
15
16
17
# apply 参数CRD ~$ vi Constraint.yaml apiVersion: constraints.gatekeeper.sh/v1beta1 kind: K8sRequiredLabels metadata: name: ns-must-have-owner-usage spec: match: kinds: - apiGroups: [""] kinds: ["Namespace"] parameters: labels: ["owner","usage"] ~$ kl apply -f Constraint.yaml k8srequiredlabels.constraints.gatekeeper.sh/ns-must-have-owner-usage created
1
2
3
# test ns creation % kl create ns xx Error from server ([ns-must-have-owner-usage] you must provide labels: {"owner", "usage"}): admission webhook "validation.gatekeeper.sh" denied the request: [ns-must-have-owner-usage] you must provide labels: {"owner", "usage"}
使用感受是,这个比原生的opa(即gatekeeper v1)要好用。
1
2
3
4
~$ kl get ValidatingWebhookConfiguration NAME WEBHOOKS AGE gatekeeper-validating-webhook-configuration 2 5m36s ingress-nginx-admission 1 4d5h
还可以看到原先的ns不满足约束:
1
2
3
4
5
6
7
8
9
10
~$ kl get K8sRequiredLabels -ojsonpath='{.items[*].status.violations}' | jq [ { "enforcementAction": "deny", "kind": "Namespace", "message": "you must provide labels: {\"owner\", \"usage\"}", "name": "kube-system" }, ...... ]
AppArmor配置一个程序拥有的权限,能做的事,不能做的事。
要能起作用,必须是内核打开了开关,同时要预先加载你想要的profile。
1 https://kubernetes.io/docs/tutorials/clusters/apparmor/
1
2
3
4
5
6
7
8
9
# check if kernel support enabled ~$ cat /sys/module/apparmor/parameters/enabled Y # 或者 ~$ kubectl get nodes -o=jsonpath=$'{range .items[*]}{@.metadata.name}: {.status.conditions[?(@.reason=="KubeletReady")].message}\n{end}' server1: kubelet is posting ready status. AppArmor enabled server2: kubelet is posting ready status. AppArmor enabled
1
2
3
4
5
6
7
8
9
10
11
12
13
14
15
16
17
18
19
# check profile already loaded # profile在这里就是指的一个apparmor规则文件 ~$ sudo cat /sys/kernel/security/apparmor/profiles cri-containerd.apparmor.d (enforce) /snap/snapd/13269/usr/lib/snapd/snap-confine (enforce) /snap/snapd/13269/usr/lib/snapd/snap-confine//mount-namespace-capture-helper (enforce) snap.lxd.lxd (enforce) ...... # 或者 ~$ sudo apparmor_status apparmor module is loaded. 32 profiles are loaded. 32 profiles are in enforce mode. /snap/snapd/13269/usr/lib/snapd/snap-confine /snap/snapd/13269/usr/lib/snapd/snap-confine//mount-namespace-capture-helper ......
1
2
3
4
5
6
# how to load profile 加载profile可以把profile放到/etc/apparmor.d/下开机自动加载, 或者执行apparmor_parser filename手动每次加载。 # how to unload profile apparmor_parser -R filename
apparmor的配置方法:
1
2
3
4
5
6
7
8
9
10
11
12
13
14
15
16
17
18
19
20
21
第一种配置方式是通过在pod的annotations中添加配置来实现的。 annotations: container.apparmor.security.beta.kubernetes.io/containerName: xxxx containerName是实际的容器的name;xxxx这里支持3种值。 1. runtime/default,默认的profile。 和留空不配annotation是等价的(在启动了apparmor和没在psp配置apparmor的情况下)。 2. localhost/<profile_name>, 就是加载本机的apparmor规则。 3. unconfined, 不应用任何apparmor规则。 第二种配置方式是在psp中配置,psp我们前面已经介绍过。 如果PSP启动了,那么可以在psp中配置全局的apparmor,影响范围是psp被pod选中的时候的那些pod。 可以在psp中配置annotations: apparmor.security.beta.kubernetes.io/defaultProfileName: <profile_ref> apparmor.security.beta.kubernetes.io/allowedProfileNames: <profile_ref>[,others...] defaultProfileName是没有配置apparmor的时候默认应用的profile。 allowedProfileNames是pod中允许使用的profile。 如果default和allowed都配了,allowed必须包含default这个profile。 The default profile name option specifies the profile to apply to containers by default when none is specified. The allowed profile names option specifies a list of profiles that Pod containers are allowed to be run with. If both options are provided, the default must be allowed.
使用举例, 创建一个应用了apparmor的pod:
1
2
3
4
5
6
7
8
9
10
11
12
13
14
15
16
17
18
19
20
21
22
23
24
25
26
27
28
29
30
31
32
33
34
35
36
37
38
39
40
41
42
43
44
45
46
47
48
49
50
51
52
53
54
55
56
57
58
59
60
61
62
63
64
65
66
67
68
69
70
71
72
73
74
75
76
77
78
79
80
81
82
83
84
85
86
87
88
89
90
91
92
93
94
95
96
97
98
# create yaml ~$ vi busyapparmor.yaml apiVersion: v1 kind: Pod metadata: creationTimestamp: null labels: run: busy1 name: busy1 annotations: container.apparmor.security.beta.kubernetes.io/busy1: localhost/k8s-apparmor-example-deny-write spec: containers: - image: busybox name: busy1 command: - sh - -c - "echo 'AABBCC' && sleep 1h" resources: {} dnsPolicy: ClusterFirst restartPolicy: Never status: {} # apply yaml ~$ kl apply -f busyapparmor.yaml pod/busy1 created # check pod status ~$ kl get pod NAME READY STATUS RESTARTS AGE busy1 0/1 Blocked 0 50s 可以看到pod的状态是Blocked,并且可以从message看到错误信息: ~$ kl get pod busy1 -o jsonpath='{.status.message}' Cannot enforce AppArmor: profile "k8s-apparmor-example-deny-write" is not loaded 可以看到因为profile没有加载,所以pod无法成功启动。 现在我们要做的是在server2中加载profile,然后给server2配置label,然后给pod配置nodeSelector,这样就可以确保pod被加载到server2中. ~$ vi deny_write.profile #include <tunables/global> profile k8s-apparmor-example-deny-write flags=(attach_disconnected) { #include <abstractions/base> file, # Deny all file writes. deny /** w, } ~$ sudo apparmor_parser deny_write.profile ~$ kl label node server2 profile=k8s-apparmor-example-deny-write node/server2 labeled ~$ vi busyapparmor.yaml # 添加nodeSelecctor apiVersion: v1 kind: Pod metadata: creationTimestamp: null labels: run: busy1 name: busy1 annotations: container.apparmor.security.beta.kubernetes.io/busy1: localhost/k8s-apparmor-example-deny-write spec: nodeSelector: profile: k8s-apparmor-example-deny-write containers: - image: busybox name: busy1 command: - sh - -c - "echo 'AABBCC' && sleep 1h" resources: {} dnsPolicy: ClusterFirst restartPolicy: Never status: {} ~$ kl apply -f busyapparmor.yaml --force pod/busy1 configured # 重新查看pod的状态 ~$ kl get pod -owide NAME READY STATUS RESTARTS AGE IP NODE NOMINATED NODE READINESS GATES busy1 1/1 Running 0 21s 10.244.192.10 server2 <none> <none> 可以看到pod已经成功在server2上面执行了。 通过执行下面命令可以doubel check加载profile成功了。 ~$ kl exec busy1 -- cat /proc/1/attr/current k8s-apparmor-example-deny-write (enforce)
介绍k8s中认证方面的一些知识,考试不会直接考到,就是属于了解一下k8s的知识。
1
2
3
4
5
6
7
8
9
10
11
12
13
14
15
16
17
18
19
20
21
22
23
24
25
26
27
28
29
# 资料 https://kubernetes.io/docs/reference/access-authn-authz/authentication/ https://kubernetes.io/docs/tasks/extend-kubernetes/configure-aggregation-layer/#authentication-flow # 用户类型 All Kubernetes clusters have two categories of users: service accounts managed by Kubernetes, and normal users. SA是在k8s集群内部管理的,user是外部管理的。 # 认证方式 我现在只知道X509 cert client/service account/openid connect(OIDC)这几个认证方式。 除了sa,其他的都属于user。 # 认证形式 而认证形式我知道的包括X509 cert client/token(包括static token,bootstrap token,sa token,openid token)/aggregator proxy Kubernetes uses client certificates, bearer tokens, or an authenticating proxy to authenticate API requests through authentication plugins。 # aggregator proxy(集合层)的实现机制 aggregator proxy是在apiserver实现的一个扩展机制,允许它把请求转发给另一个服务。 从角色上来说包含apiserver handler和extension server handler两个, apiserver handler会把部分请求转发给extension server,这个extension server有自己的CA,在apiserver handler转发给extension的时候会使用对应的client cert, 同时在http header中带上客户端的用户名等信息,这样extension就不需要再验证一遍了。 转发的时候用到了apiserver的这几个参数 - --requestheader-allowed-names=front-proxy-client # 证书中的CN - --requestheader-client-ca-file=/etc/kubernetes/pki/front-proxy-ca.crt - --requestheader-extra-headers-prefix=X-Remote-Extra- - --requestheader-group-headers=X-Remote-Group - --requestheader-username-headers=X-Remote-User 所谓的proxy机制也就是extension server通过requestheader-client-ca-file这个独立的ca文件验证proxy(apiserver自己)的身份,随后信任proxy。 信任之后通过proxy携带的相关username等信息组合出用户的完整信息。这个机制用来扩展apiserver的功能,扩展功能都放在extension server。
1
2
https://kubernetes.io/docs/tasks/extend-kubernetes/configure-aggregation-layer/ https://itnext.io/our-journey-in-building-a-kubernetes-aggregated-api-server-29a4f9c1de22
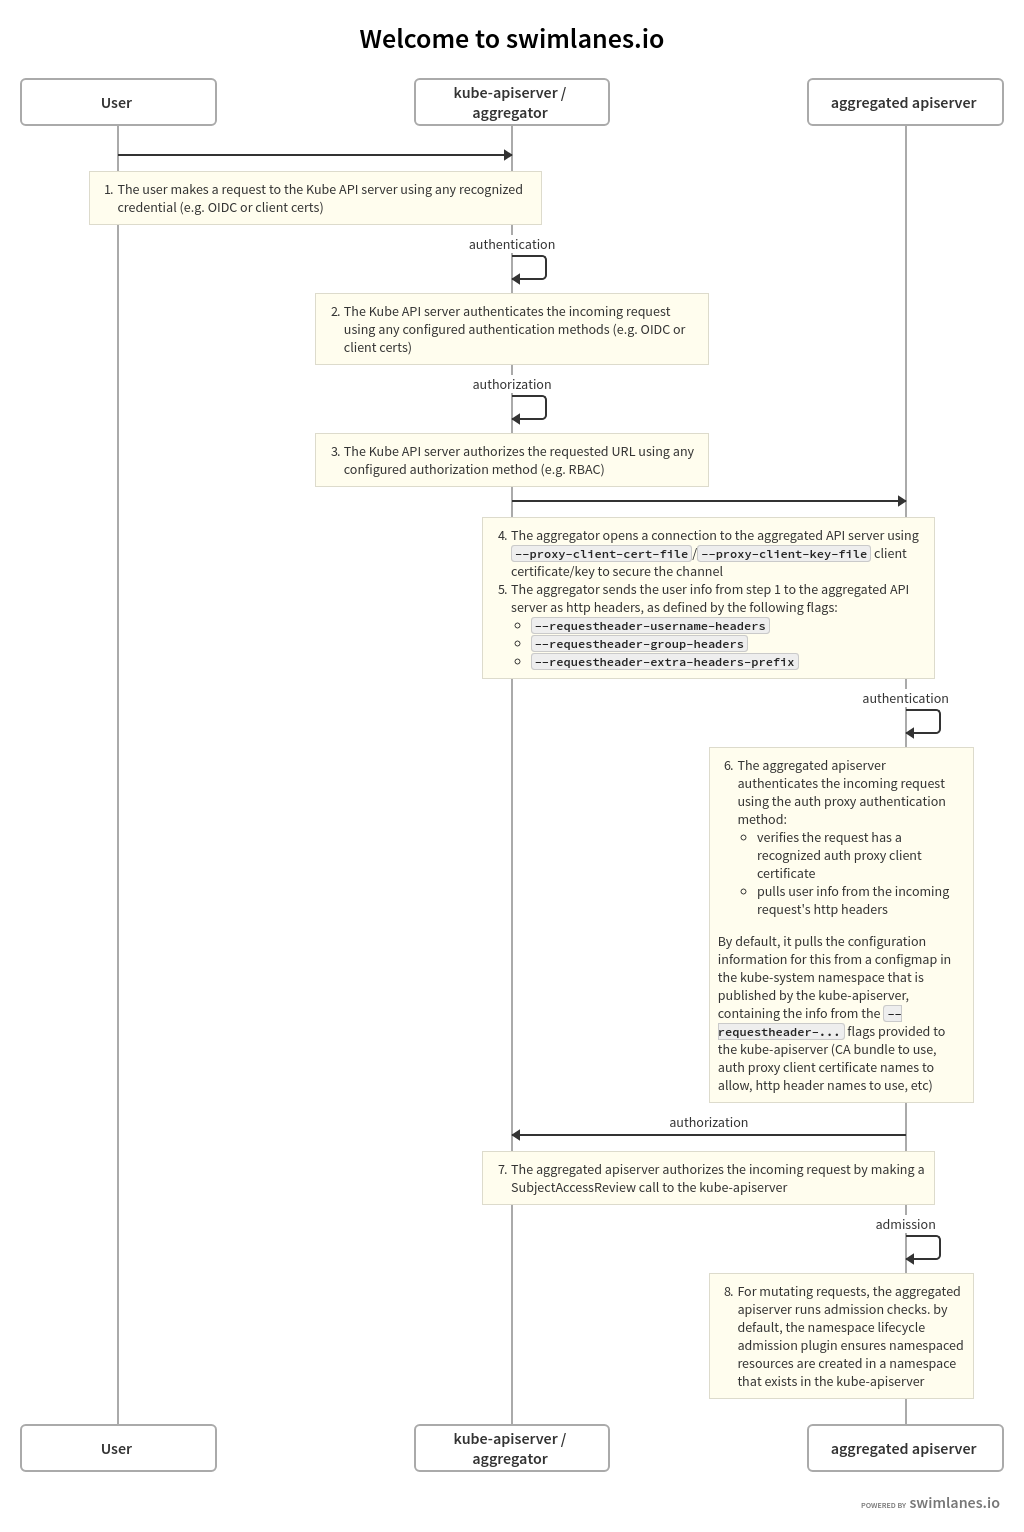
集合层的机制上面提了,关于他的流程我们可以了解一下,他是apiserver实现的一个扩展机制。
整个流程中涉及两个角色apiserver和extension server,为了同官方文档对应,我们叫他们aggregator以及aggregated。其中aggregated负责扩展某个功能。类比一下,就是aggregator监听某个路径下的请求,然后将它转发给aggregated,aggregated也就是一个扩展服务器。
aggregated首先会将自己注册到aggregator上去,aggregator收到用户请求后先对请求进行认证和授权,认证流程跟正常一样,授权流程这里暂时只是检查有没有对这个路径的访问权限,路径则关联功能。然后aggregator把请求转发给aggregated,aggregated收到请求后,同样要经过认证和授权两个步骤。
认证是使用证书的方式进行安全验证,aggregator需要携带证书来请求aggregated。授权则是从请求的http header中取出用户名用户组等信息,由于经过了认证,所以这里对于取出的header中信息的真实性就可以直接信任了,aggregated然后根据获取到的用户信息发送SujectAccessReview给aggregator进行授权,这里授权的则是这个用户有没有操作某个资源的权限,而不是刚才检查是否有路径的访问权限。授权通过的话就可以执行具体的业务。
整个流程如图:
图片来自Authentication Flow
我们可以看到aggregated就是一个独立的服务,用来扩展apiserver,它只是把前期的认证阶段交给了原来的apiserver来做。
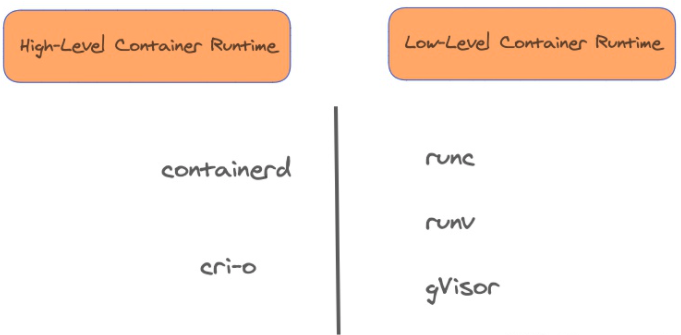
说到容器运行时,我们会想到docker,containerd,cri-o, 同时你也可能想到runc,gvisor,事实上,这几个都叫容器运行时,但是前者又是可以调用后者的,这就比较让人困惑了。所以通常来说,前者(docker,containerd,cri-o)我们叫它上层容器运行时(high-level container runtimes),后者(runc,gvisor)我们叫它底层容器运行时(low-level container runtimes)。如图:
图片来自一文看懂 Container Runtime
k8s支持使用指定的底层容器运行时,可以为某个pod指定是使用runc还是使用gvisor。要达到这个目的,首先要让上层容器运行时支持指定的底层容器运行时,这一步通过在主机中安装相应底层容器运行时,以及配置上层容器运行时来接入该底层运行时,来完成;另外就是需要在k8s中为指定的底层容器运行时创建对应的RuntimeClass资源(k8s中默认是没有RuntimeClass实例的,意味着默认是使用默认的底层运行时)。
以接入新的底层运行时gvisor为例,我们可以这么做:
1
2
3
4
5
6
7
8
9
10
11
12
13
14
15
16
17
18
19
20
21
22
23
24
首先安装另一个实现gvisor: # https://gvisor.dev/docs/user_guide/install/ ~$ vi installgvisor.sh ( set -e ARCH=$(uname -m) URL=https://storage.googleapis.com/gvisor/releases/release/latest/${ARCH} wget ${URL}/runsc ${URL}/runsc.sha512 \ ${URL}/containerd-shim-runsc-v1 ${URL}/containerd-shim-runsc-v1.sha512 sha512sum -c runsc.sha512 \ -c containerd-shim-runsc-v1.sha512 rm -f *.sha512 chmod a+rx runsc containerd-shim-runsc-v1 sudo mv runsc containerd-shim-runsc-v1 /usr/local/bin ) ~$ chmod +x installgvisor.sh ~$ ./installgvisor.sh ...... Total wall clock time: 38s Downloaded: 4 files, 57M in 35s (1.61 MB/s) runsc: OK containerd-shim-runsc-v1: OK
然后配置containerd的配置文件:
1
2
3
4
5
6
7
8
9
10
11
12
13
14
15
16
17
18
19
20
21
22
23
24
25
26
27
28
29
30
31
32
修改配置文件(不同的容器运行时使用不同的配置文件),containerd就是修改/etc/containerd/config.toml,其他运行时的修改可以参考文档: https://kubernetes.io/docs/concepts/containers/runtime-class/ ~$ sudo vi /etc/containerd/config.toml # 插入两行 # [plugins."io.containerd.grpc.v1.cri".containerd.runtimes.runsc] # runtime_type = "io.containerd.runsc.v1" ...... [plugins."io.containerd.grpc.v1.cri".containerd.default_runtime] base_runtime_spec = "" container_annotations = [] pod_annotations = [] privileged_without_host_devices = false runtime_engine = "" runtime_root = "" runtime_type = "" [plugins."io.containerd.grpc.v1.cri".containerd.default_runtime.options] [plugins."io.containerd.grpc.v1.cri".containerd.runtimes.runsc] runtime_type = "io.containerd.runsc.v1" [plugins."io.containerd.grpc.v1.cri".containerd.runtimes] [plugins."io.containerd.grpc.v1.cri".containerd.runtimes.runc] ...... # 然后重启containerd ~$ sudo systemctl daemon-reload ~$ sudo systemctl restart containerd
然后创建Runtime Class
1
2
3
4
5
6
7
8
9
10
11
12
~$ vi runtimeclass.yaml apiVersion: node.k8s.io/v1 kind: RuntimeClass metadata: name: myclass handler: runsc # 注意这里的runsc需要和/etc/containerd/config.toml中runtimes的配置对应的名字一样。 如果写的不对,这里不会报错,到最后用到的时候才会报错,导致pod启动失败。 # 然后apply ~$ kl apply -f runtimeclass.yaml runtimeclass.node.k8s.io/myclass created
然后在pod中使用
1
2
3
4
5
6
7
8
9
10
11
12
13
14
15
16
17
18
19
20
21
22
23
24
25
26
27
28
29
30
31
32
33
34
35
36
37
38
39
40
41
42
43
44
45
~$ vi ng.yaml # 注意nodeName和runtimeClassName两个字段 apiVersion: v1 kind: Pod metadata: creationTimestamp: null labels: run: ng name: ng spec: nodeName: server2 runtimeClassName: myclass containers: - image: nginx name: ng resources: {} dnsPolicy: ClusterFirst restartPolicy: Always status: {} ~$ kl apply -f ng.yaml pod/ng created 如果我们没有指定nodeName,然后pod又正好调度到了没有安装runsc的节点,那么pod会启动失败,并可以通过event看到提示: ~$ kl get event LAST SEEN TYPE REASON OBJECT MESSAGE 3s Warning FailedCreatePodSandBox pod/ng Failed to create pod sandbox: rpc error: code = Unknown desc = failed to get sandbox runtime: no runtime for "runsc" is configured 那么如何确认这个pod是使用了runsc呢? 可以进到pod中执行dmesg看到gVisor相关信息,就表示成功了。 ~$ kl exec ng -- dmesg [ 0.000000] Starting gVisor... [ 0.171422] Searching for needles in stacks... [ 0.467189] Recruiting cron-ies... [ 0.859775] Letting the watchdogs out... [ 1.044028] Forking spaghetti code... [ 1.165573] Searching for socket adapter... [ 1.559524] Checking naughty and nice process list... [ 2.035042] Singleplexing /dev/ptmx... [ 2.493387] Reticulating splines... [ 2.965587] Generating random numbers by fair dice roll... [ 3.362163] Checking naughty and nice process list... [ 3.821549] Setting up VFS2... [ 3.868035] Ready!
1
2
3
4
5
6
7
8
9
10
11
12
13
https://learnk8s.io/blog/smaller-docker-images 有几个招数: 1. 把RUN的指令合成一条,减少layer数 2. 分步build,前一步可以很大用来build最终文件;然后把最终文件copy到第二个做种的基础镜像。 3. 使用小镜像distroless(这个需要外网才能拉取到) 4. 使用alpine镜像,这个比distroless还小,而且还会携带sh,便于调试;但有个缺点是可能存在兼容性问题,同时安全性方面提供shell也是一个缺点。 比如几种镜像的大小: Image Size (MB) node:8 681 node:8 with multi stage build 678 gcr.io/distroless/nodejs 76.7 node:8-alpine 69.7
1
2
3
4
5
6
7
8
9
10
11
12
https://cloud.google.com/blog/products/containers-kubernetes/kubernetes-best-practices-terminating-with-grace https://kubernetes.io/docs/concepts/workloads/pods/pod-lifecycle/ 1. 状态设为Terminating 这是一个流量挡板,不再接受新的流量,pod也会从svc的endpoints list移除。 2. 发送用户自定义的preStop请求,场景是用户无法控制SIGTERM的回调逻辑。 随后发送SIGTERM给进程,通知退出。所以preStop最好不要阻塞,以免SIGTERM发不出来。 3. 集群等待terminationGracePeriodSeconds直到进程退出或者超时。 preStop和SIGTERM引发的异步退出是并行的,所以等待是同时等待他们两个。 terminationGracePeriodSeconds的时间是在发送preStop之前的某个时间就开始了的。 4. 发送SIGKILL给进程,也就是kill -9, 强制结束进程,清除容器。 5. 从apiserver中清理掉pod。
几个存储日志的地方,特别是有时候apiserver异常,想看apiserver的日志的时候,没法通过kubectl查看。这时候可以直接到那个目录去看日志。
1
2
3
4
5
6
7
8
https://itnext.io/cks-exam-series-4-crash-that-apiserver-5f4d3d503028 Log locations to check: /var/log/pods # pod的日志, apiserver连不上时可以尝试从这里查看日志 /var/log/containers # container的日志, 这里的log软连接到pods目录下 docker ps + docker logs crictl ps + crictl logs (in case when Docker isn’t used) kubelet logs: /var/log/syslog or journalctl -u kubelet # 这两个好像是一样的
1
2
3
资料: https://github.com/killer-sh/cks-challenge-series/tree/master/challenges/ImagePolicyWebhook https://kubernetes.io/docs/reference/access-authn-authz/admission-controllers/#imagepolicywebhook
ImagePolicyWebhook也是admission-control中的一个插件,需要通过apiserver的参数–enable-admission-plugins开启,并需要在–admission-control-config-file指定的文件中插入相关配置。
ImagePolicyWebhook的作用是通过webhook来检查这个image是否被允许。他需要配置几个功能相关的字段,同时需要配置相关的证书文件。
我们一步一步来完成配置:
1
2
3
4
5
6
7
8
9
10
11
12
13
14
15
16
17
18
19
20
21
22
23
24
25
26
27
28
29
30
31
32
33
34
35
36
37
38
39
40
41
42
43
44
45
46
47
48
49
50
51
52
53
54
55
56
57
58
59
60
61
62
63
64
65
66
67
68
69
70
71
# 1. 添加ImagePolicyWebhook插件 /etc/kubernetes/admission$ sudo vi admission-control-config-file.yaml ... - name: ImagePolicyWebhook path: image-policy.yaml ... # 2. 添加image-policy.yaml文件 /etc/kubernetes/admission$ sudo vi image-policy.yaml imagePolicy: kubeConfigFile: /etc/kubernetes/admission/image-kubeconf.yaml # time in s to cache approval allowTTL: 50 # time in s to cache denial denyTTL: 50 # time in ms to wait between retries retryBackoff: 500 # determines behavior if the webhook backend fails defaultAllow: false # 3. 添加image-kubeconf.yaml文件 # ImagePolicyWebhook是通过kubeconfig格式的文件来配置对外部的访问。 /etc/kubernetes/admission$ sudo vi image-kubeconf.yaml apiVersion: v1 kind: Config clusters: - cluster: certificate-authority: /etc/kubernetes/admission/imagecert/external-cert.pem server: https://external-service:1234/check-image name: image-checker contexts: - context: cluster: image-checker user: api-server name: image-checker current-context: image-checker preferences: {} users: - name: api-server user: client-certificate: /etc/kubernetes/admission/imagecert/apiserver-client-cert.pem # cert for the webhook admission controller to use client-key: /etc/kubernetes/admission/imagecert/apiserver-client-key.pem 这里我们设置一个不存在的server地址,因为没有这样的server用来测试。 然后指定了client-certificate和client-key作为客户端的证书,指定certificate-authority作为外部服务的CA证书。 # 4. 创建证书文件。 /etc/kubernetes/admission$ sudo mkdir imagecert /etc/kubernetes/admission$ cd imagecert/ # 我们借助现成的一套证书来做测试 /etc/kubernetes/admission/imagecert$ sudo wget https://github.com/killer-sh/cks-challenge-series/archive/refs/heads/master.zip -O /tmp/resource.zip # ...... /etc/kubernetes/admission/imagecert$ unzip /tmp/resource.zip -d /tmp # ...... /etc/kubernetes/admission/imagecert$ sudo cp /tmp/cks-challenge-series-master/challenges/ImagePolicyWebhook/*.pem ./ /etc/kubernetes/admission/imagecert$ ls apiserver-client-cert.pem apiserver-client-key.pem external-cert.pem external-key.pem /etc/kubernetes/admission/imagecert$ ls .. admission-control-config-file.yaml image-kubeconf.yaml imagecert eventconfig.yaml image-policy.yaml # eventconfig.yaml是另一个插件配置了EventRateLimit # 5. 开启ImagePolicyWebhook开关 /etc/kubernetes/admission/imagecert$ sudo vi ../../manifests/kube-apiserver.yaml ... - --enable-admission-plugins=NodeRestriction,PodSecurityPolicy,EventRateLimit,ImagePolicyWebhook ...
等待apiserver重启完成,我们来测试创建pod,由于外部服务不可达,所以我们的pod会一直无法创建成功。
1
2
~$ kl run ng1 --image nginx Error from server (Forbidden): pods "ng1" is forbidden: Post "https://external-service:1234/check-image?timeout=30s": dial tcp: lookup external-service on 192.168.3.1:53: no such host
随后我们编辑image-policy.yaml,把其中defaultAllow设成true。
1
2
3
4
5
6
7
8
9
10
11
/etc/kubernetes/admission$ sudo vi image-policy.yaml imagePolicy: kubeConfigFile: /etc/kubernetes/admission/image-kubeconf.yaml # time in s to cache approval allowTTL: 50 # time in s to cache denial denyTTL: 50 # time in ms to wait between retries retryBackoff: 500 # determines behavior if the webhook backend fails defaultAllow: true
然后重启apiserver。我们再次执行创建pod,发现可以创建成功了。
1
2
~$ kl run ng1 --image nginx pod/ng1 created
1
2
3
4
immutable主要是指pod不能修改主机文件 security context中的readOnlyRootFilesystem以及privileged都得是false。 stateles主要是不能存数据在container中,emptyDir的volume也不行。
kubesec是一个静态扫描的工具,扫描一个yaml文件存在的安全隐患。
1
2
3
4
5
6
7
8
9
10
11
12
13
14
15
16
17
18
19
20
21
22
23
24
25
26
27
28
29
30
31
32
文档: https://github.com/controlplaneio/kubesec # install go install github.com/controlplaneio/kubesec/v2@latest # then kl run ngsec --image nginx --restart=Never --dry-run=client -oyaml > ngsec.yaml kubesec scan ngsec.yaml # 我们也可以使用他的免安装版: ~$ kl run ngsec --image nginx --restart=Never --dry-run=client -oyaml > ngsec.yaml ~$ curl -sSX POST --data-binary @"ngsec.yaml" https://v2.kubesec.io/scan [ { "object": "Pod/ngsec.default", "valid": true, "fileName": "API", "message": "Passed with a score of 0 points", "score": 0, "scoring": { "advise": [ { "id": "ApparmorAny", "selector": ".metadata .annotations .\"container.apparmor.security.beta.kubernetes.io/nginx\"", "reason": "Well defined AppArmor policies may provide greater protection from unknown threats. WARNING: NOT PRODUCTION READY", "points": 3 }, ...... ] } } ]
静态扫描镜像的安全风险。
1
2
3
4
5
6
7
8
9
10
11
12
13
14
15
16
17
18
19
20
21
22
23
24
25
26
27
28
29
30
31
32
33
34
35
36
37
38
39
40
41
42
43
44
# install https://aquasecurity.github.io/trivy/v0.22.0/getting-started/installation/ # 注意,trivy不存在我所使用的树莓派的系统的源,所以用apt的方式拉不到 # 尝试用源码编译,却遇到网络问题,所以我放弃在树莓派上的安装。改在自己的pc上安装,因为这个就是一个静态扫描的,并不依赖集群,所以随便装到一个能装上的机器就可以了。 # 使用方法: # https://github.com/aquasecurity/trivy # 比如扫描镜像yizhiren/opa:0.35.0-rootless % trivy image yizhiren/opa:0.35.0-rootless 2022-01-08T12:38:44.803+0800 INFO Detected OS: ubuntu 2022-01-08T12:38:44.805+0800 INFO Detecting Ubuntu vulnerabilities... 2022-01-08T12:38:44.812+0800 INFO Number of language-specific files: 1 2022-01-08T12:38:44.812+0800 INFO Detecting gobinary vulnerabilities... yizhiren/opa:0.35.0-rootless (ubuntu 21.10) =========================================== Total: 21 (UNKNOWN: 0, LOW: 18, MEDIUM: 3, HIGH: 0, CRITICAL: 0) +------------------+------------------+----------+-----------------------+---------------+-----------------------------------------+ | LIBRARY | VULNERABILITY ID | SEVERITY | INSTALLED VERSION | FIXED VERSION | TITLE | +------------------+------------------+----------+-----------------------+---------------+-----------------------------------------+ | coreutils | CVE-2016-2781 | LOW | 8.32-4ubuntu2 | | coreutils: Non-privileged | | | | | | | session can escape to the | | | | | | | parent session in chroot | | | | | | | -->avd.aquasec.com/nvd/cve-2016-2781 | +------------------+------------------+----------+-----------------------+---------------+-----------------------------------------+ | libc-bin | CVE-2021-38604 | MEDIUM | 2.34-0ubuntu3 | | glibc: NULL pointer dereference in | | | | | | | helper_thread() in mq_notify.c while | | | | | | | handling NOTIFY_REMOVED messages... | | | | | | | -->avd.aquasec.com/nvd/cve-2021-38604 | + +------------------+----------+ +---------------+-----------------------------------------+ | | CVE-2016-10228 | LOW | | | glibc: iconv program can hang | | | | | | | when invoked with the -c option | | | | | | | -->avd.aquasec.com/nvd/cve-2016-10228 | + +------------------+ + +---------------+-----------------------------------------+ ...... 可以看到列出了安全风险以及风险级别。 trivy还支持fs和config子命令,考试只会考到trivy image,但是其他两个子命令也有实用价值。 fs会扫描目录下的所有文件,检查其中的引入的风险点,包括镜像名,库名,某个字段。 config则只会扫描目录下文件中的字段。 github主页中都有列举:https://github.com/aquasecurity/trivy#quick-start
syft也是静态扫描工具,可以列出image中的软件清单
1
2
3
4
5
6
7
8
9
10
11
12
13
14
15
16
17
18
19
20
21
22
23
24
25
https://github.com/anchore/syft # install curl -sSfL https://raw.githubusercontent.com/anchore/syft/main/install.sh | sh -s -- -b /usr/local/bin 如果网络问题,可以先把install.sh内容去保存下来,然后cat install.sh | sh -s -- -b /usr/local/bin latest 如果还是有网络问题,立即换到网络通畅的机器上,这个反正是静态工具,不依赖集群的。 # usage % syft yizhiren/opa:0.35.0-rootless ✔ Pulled image ✔ Loaded image ✔ Parsed image ✔ Cataloged packages [101 packages] NAME VERSION TYPE adduser 3.118ubuntu5 deb apt 2.3.9 deb base-files 11.1ubuntu5 deb base-passwd 3.5.51 deb bash 5.1-3ubuntu2 deb bsdutils 1:2.36.1-8ubuntu2 deb coreutils 8.32-4ubuntu2 deb dash 0.5.11+git20210120+802ebd4-1build1 deb debconf 1.5.77 deb ......
grype也是安全检查用的,跟trivy是一样的作用。grype内部依赖syft的列清单功能。
1
2
3
4
5
6
7
8
9
10
11
12
13
14
15
16
17
18
19
20
21
22
23
24
25
https://github.com/anchore/grype # install curl -sSfL https://raw.githubusercontent.com/anchore/grype/main/install.sh | sh -s -- -b /usr/local/bin 如果网络问题,可以先把install.sh内容去保存下来,然后cat install.sh | sh -s -- -b /usr/local/bin latest 如果还是有网络问题,立即换到网络通畅的机器上,这个反正是静态工具,不依赖集群的。 # usage: % grype yizhiren/opa:0.35.0-rootless ✔ Vulnerability DB [updated] ✔ Loaded image ✔ Parsed image ✔ Cataloged packages [101 packages] ✔ Scanned image [21 vulnerabilities] NAME INSTALLED FIXED-IN VULNERABILITY SEVERITY coreutils 8.32-4ubuntu2 CVE-2016-2781 Low libc-bin 2.34-0ubuntu3 CVE-2016-10228 Negligible libc-bin 2.34-0ubuntu3 CVE-2021-38604 Medium libc-bin 2.34-0ubuntu3 CVE-2020-29562 Low libc-bin 2.34-0ubuntu3 CVE-2019-25013 Low libc6 2.34-0ubuntu3 CVE-2016-10228 Negligible libc6 2.34-0ubuntu3 CVE-2021-38604 Medium ......
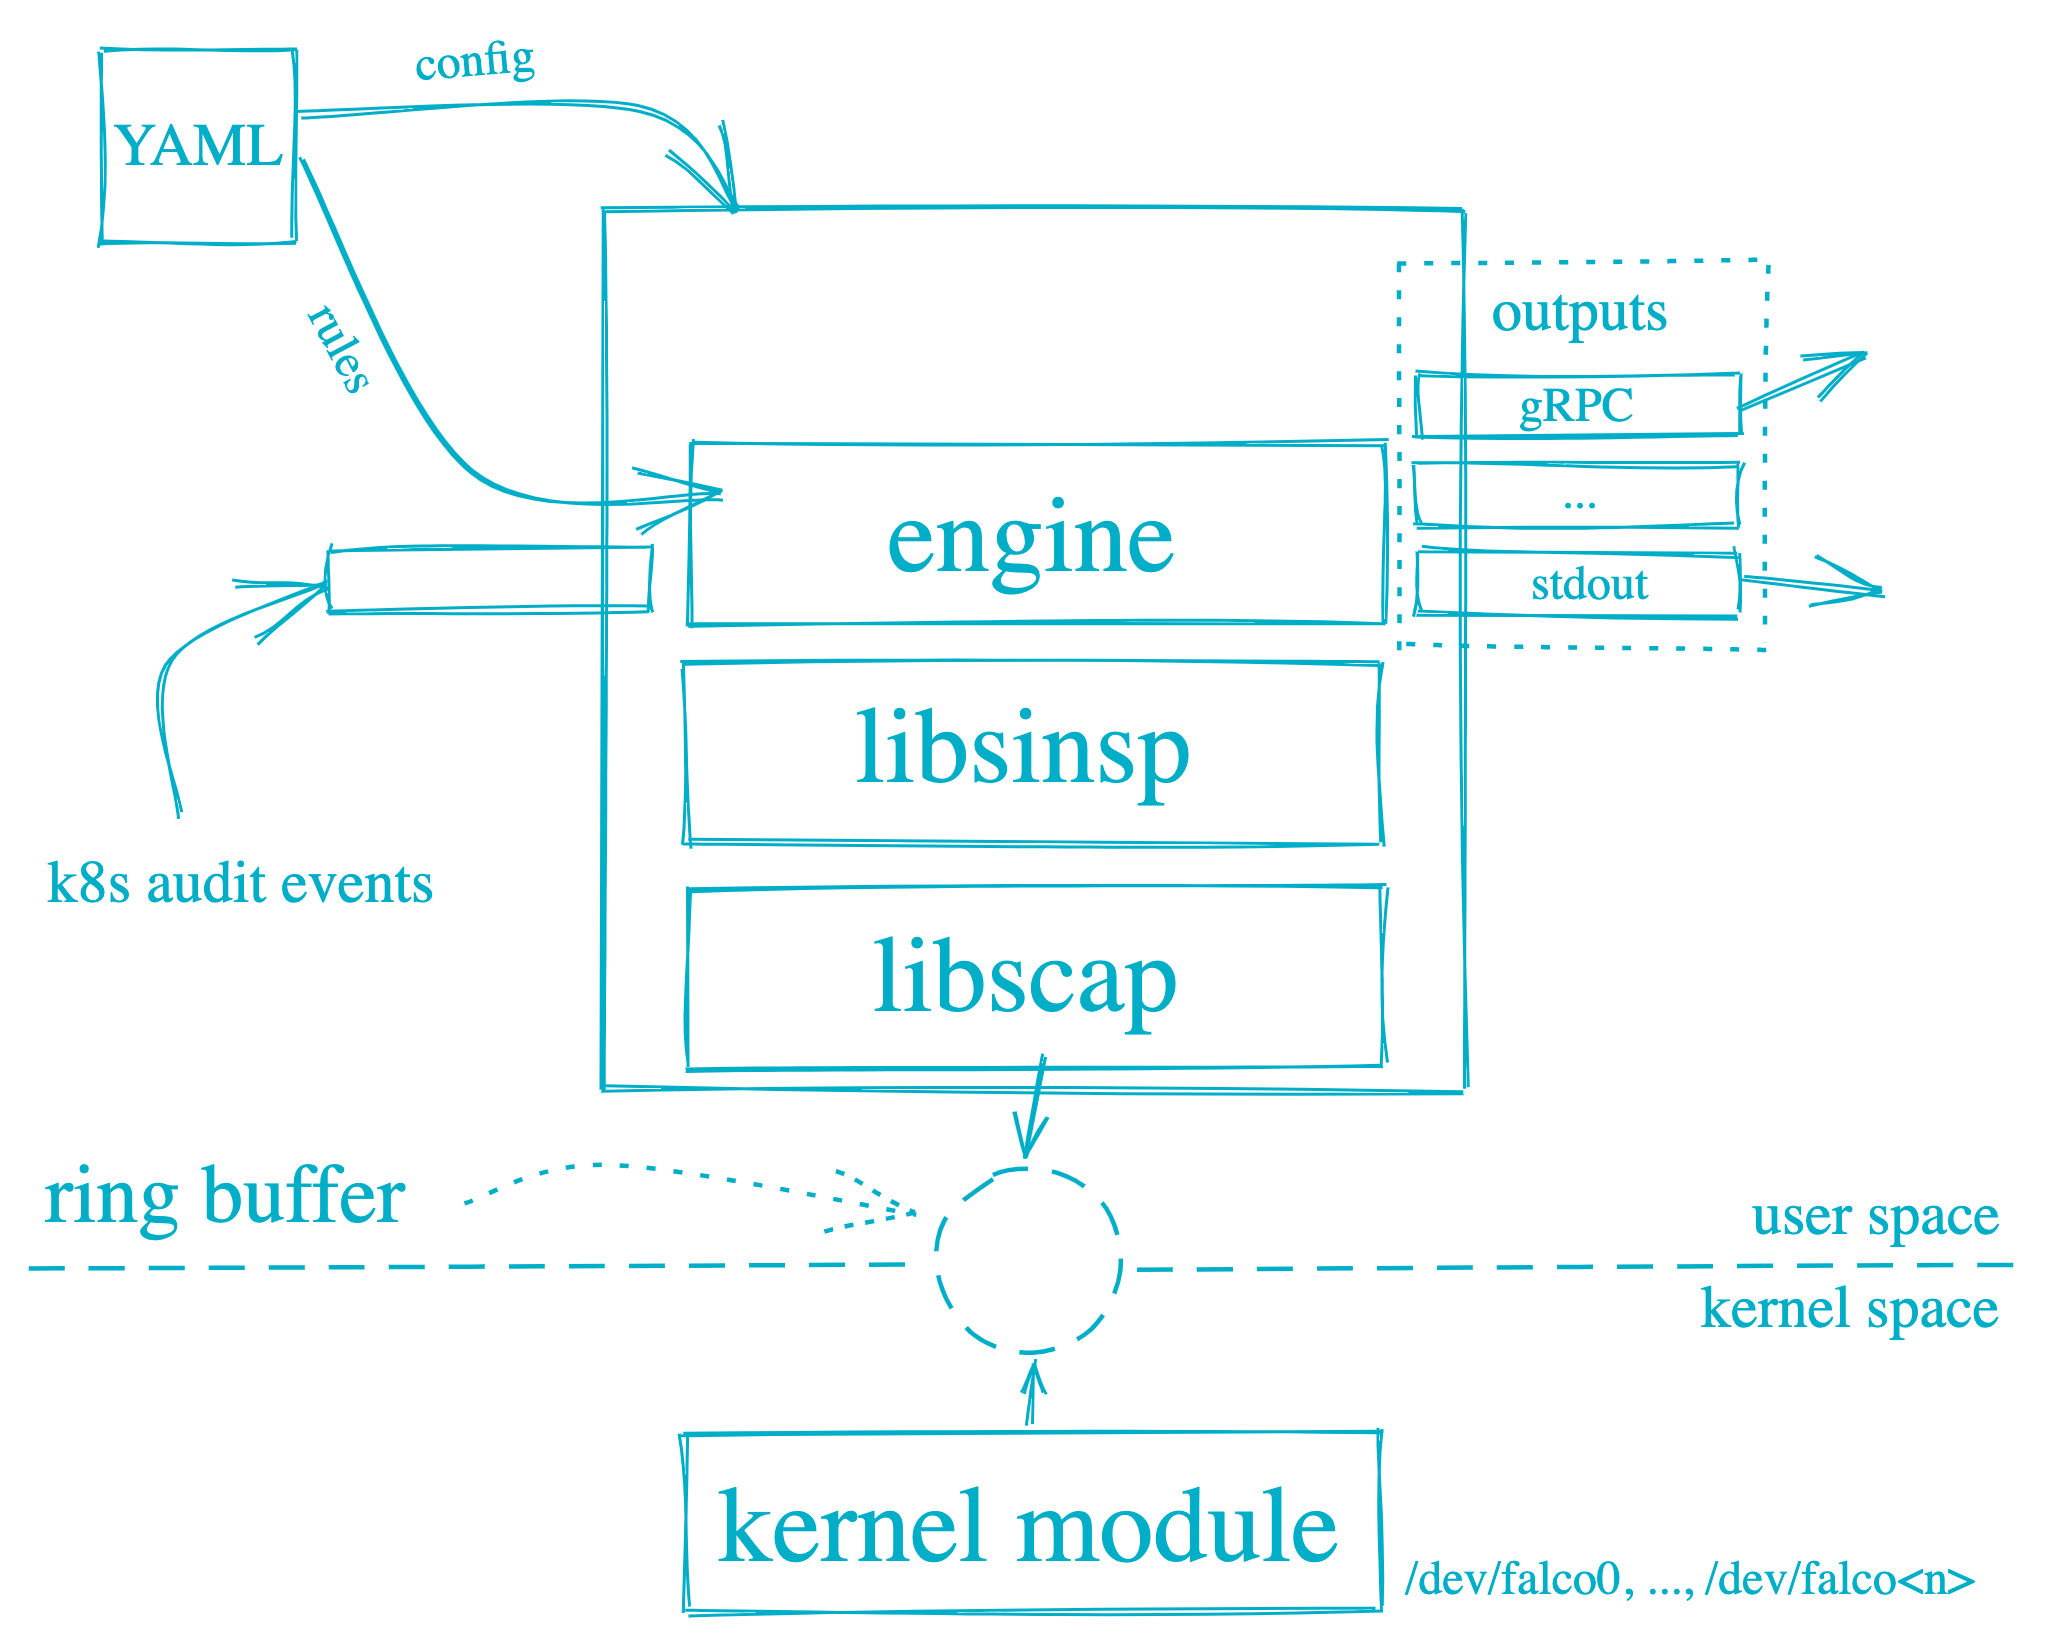
falco会安装内核驱动,然后收集系统的所有行为,然后在上层通过规则来过滤关注的事件并记录日志,是个很强悍的工具。
图片来自Getting Started
安装falco有两种途径,一种是物理机直接安装,一种是通过docker安装,不过遗憾的是这个工具不支持arm。所以树莓派上跑不起来,还是得在外部机器安装一下,这个工具考试是必考的,大家一定要找个集群安装上尝试一下。
1 N: Skipping acquire of configured file 'main/binary-arm64/Packages' as repository 'https://download.falco.org/packages/deb stable InRelease' doesn't support architecture 'arm64'
下面的步骤基于amd64的机器。
1
2
3
4
5
6
7
8
9
10
11
12
13
14
15
16
17
18
19
20
21
22
23
24
25
26
27
28
29
30
31
32
33
34
35
36
37
38
39
40
41
42
43
44
45
46
47
48
49
50
51
52
# 安装falco # 直接root用户下操作的,所以省略sudo命令,若非root请加上sudo # https://falco.org/docs/getting-started/installation/ # https://falco.org/docs/getting-started/running/ # 直接安装 curl -s https://falco.org/repo/falcosecurity-3672BA8F.asc | apt-key add - echo "deb https://download.falco.org/packages/deb stable main" \ | tee -a /etc/apt/sources.list.d/falcosecurity.list apt install linux-headers-$(uname -r) apt-get update && sudo apt-get install falco -y systemctl start falco systemctl status falco # insert kernel module falco-driver-loader # check working curl localhost:8765/healthz; echo # 通过docker安装 # load driver docker pull falcosecurity/falco-driver-loader:latest docker run --rm -i -t \ --privileged \ -v /root/.falco:/root/.falco \ -v /proc:/host/proc:ro \ -v /boot:/host/boot:ro \ -v /lib/modules:/host/lib/modules:ro \ -v /usr:/host/usr:ro \ -v /etc:/host/etc:ro \ falcosecurity/falco-driver-loader:latest && echo "Falco drivers installed!" # run falco docker pull falcosecurity/falco-no-driver:latest docker run --rm -d \ --name "falco_training" \ --security-opt apparmor:unconfined \ -p 8765:8765 \ -e HOST_ROOT=/ \ --cap-add SYS_PTRACE \ --pid=host $(ls /dev/falco* | xargs -I {} echo --device {}) \ -v /var/run/docker.sock:/var/run/docker.sock \ falcosecurity/falco-no-driver:latest
测试功能:
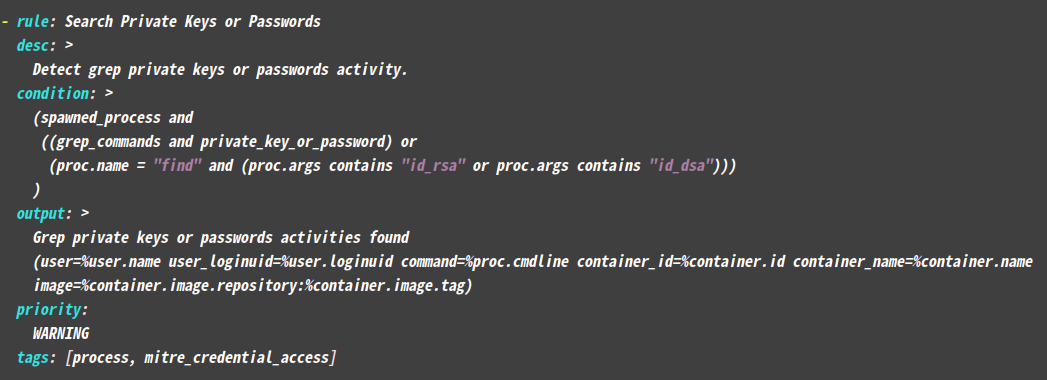
1
2
3
4
5
6
7
8
9
10
11
12
13
14
15
16
17
18
19
20
21
22
23
24
25
26
27
28
29
30
31
32
33
34
默认的falco就会关注一些事件并做记录,我们就来测试这些事件。 # 1. 运行敏感操作,这是一个敏感操作,需要被关注。 root@ubsvr1:~# docker run -v /root:/root busybox sh -c "find /root -name id_rsa" /root/.ssh/id_rsa 注意这里挂载root目录是模拟真实的危险场景,不挂载也不影响本次测试。 # 2. 然后查看falco的日志,看看有没有捕捉到。 # https://falco.org/docs/getting-started/running/ # 日志获取有两种情况,针对直接安装和docker安装分别如此查看日志: host安装的话: journalctl -u falco docker安装的话: docker logs container-name root@ubsvr1:~# docker logs falco_training 2>&1 | grep "find /root -name id_rsa" # 或者 journalctl -u falco | grep "find /root -name id_rsa" Jan 22 13:40:31 ubsvr1 falco[1746328]: 13:40:31.098801741: Warning Grep private keys or passwords activities found (user=root user_loginuid=-1 command=find /root -name id_rsa container_id=8b66d2dd103b container_name=<NA> image=<NA>:<NA>) # 3. 我们来找一下这个规则是在哪里配置的 # host方式安装的话,配置文件列表在/etc/falco/falco.yaml中配置: rules_file: - /etc/falco/falco_rules.yaml - /etc/falco/falco_fules.local.yaml - /etc/falco/k8s_audit_rules.yaml - /etc/falco/rules.d docker方式运行的话,就是容器内的这些文件。 # 找到了配置 root@ubsvr1:/etc/falco# grep "Grep private keys or passwords activities found" . -r ./falco_rules.yaml: Grep private keys or passwords activities found 然后通过vi去查看文件,可以查看这条规则的详情:
1 可以看到一个规则(rule)的基本结构,condition和触发条件,output是输出格式。
1
2
3
4
5
6
7
8
9
10
11
12
13
14
15
16
17
output输出到哪里,定义在/etc/falco/falco.yaml中 在配置文件中alert配置类似如下: file_output: enabled: false keep_alive: false filename: ./events.txt stdout_output: enabled: true program_output: enabled: false keep_alive: false program: "jq '{text: .output}' | curl -d @- -X POST https://hooks.slack.com/services/XXX"
最后最主要的falco的规则部分,需要经过简单的学习:
1
2
3
4
5
6
7
8
9
10
11
12
参考文档,至少要学会配置一个最基本的rule。 https://falco.org/docs/examples/ https://falco.org/docs/rules/ 再举一个例子参考: # 例子:禁止写/etc/hosts - rule: Detect Write Below /etc/hosts desc: an attempt to write to /etc/hosts file (CVE-2020-8557) condition: open_write and container and fd.name=/etc/hosts output: "File /etc/hosts opened for writing (user=%user.name command=%proc.cmdline parent=%proc.pname pcmdline=%proc.pcmdline file=%fd.name program=%proc.name gparent=%proc.aname[2] ggparent=%proc.aname[3] gggparent=%proc.aname[4] container_id=%container.id image=%container.image.repository)" priority: ERROR tags: [filesystem, mitre_persistence]
我一直装不起来,没有成功使用过,好在最后考试也没考到他。
我记录一下我折腾的安装方法,你们可以不用参考我的,用你能装上的就行。我有机会会再次尝试。(TODO)
1
2
3
4
5
6
7
8
9
10
11
12
13
14
15
16
17
18
19
20
这个东西的安装实在是太麻烦了,文档也一点都不友好,找都找不到怎么弄。 这个sysdig是falco产品的公司,但是falco就简单很多。sysdig是整个平台。 > 先在这里下载installer https://github.com/draios/sysdigcloud-kubernetes/releases > 然后再这里下载values.yaml https://github.com/draios/onprem-install-docs/blob/main/5.0.4/values.yaml > 然后填写values.yaml中的字段 quaypullsecret字段这么填: 从这里拷贝pull secret: https://console.redhat.com/openshift/install/pull-secret 然后 echo <secret> | base64 -w 0 获取base64后的值填到quaypullsecret中。 storageClassProvisioner填写 local username、license填个邮箱 dnsName填jinqidiguo.com 字段填写都可以参考这里 https://github.com/draios/onprem-install-docs/blob/main/5.0.4/configuration_parameters.md 但是即使配置了size为small还是无法安装成功,因为从他的错误信息看,他要求整个集群至少包含CPU14个,内存21G。
1
2
3
4
5
6
7
8
9
10
11
12
13
14
15
16
17
后来尝试了单机的sysdig https://github.com/draios/sysdig 执行: sudo docker run --rm -i -t --privileged --net=host \ -v /var/run/docker.sock:/host/var/run/docker.sock \ -v /dev:/host/dev \ -v /proc:/host/proc:ro \ -v /boot:/host/boot:ro \ -v /src:/src \ -v /lib/modules:/host/lib/modules:ro \ -v /usr:/host/usr:ro \ -v /etc:/host/etc:ro \ docker.io/sysdig/sysdig 注意由于mount了用户目录外的目录,所以docker得用apt安装不能用snap安装,不然会失败。 但是还是运行不起来,报了GLIBC not found。 好了不折腾了。
1
2
3
4
5
6
7
8
9
10
11
12
13
14
一系列的检查集群的小部件 # install # 根据这里安装krew插件 https://krew.sigs.k8s.io/docs/user-guide/setup/install/ # 然后用krew安装gadget插件 # https://github.com/kinvolk/inspektor-gadget/blob/main/docs/install.md#installing-kubectl-gadget kubectl krew install gadget # 用gadget插件部署gadget的DaemonSet # 这里arm的image没有所以arm集群会安装失败。 kubectl gadget deploy | kubectl apply -f - # 然后根据文档使用这些小部件, https://github.com/kinvolk/inspektor-gadget#the-gadgets
1
2
3
4
immutable主要是指pod不能修改主机文件 涉及security context中的readOnlyRootFilesystem以及privileged。 stateles主要是不能存状态数据在container中,emptyDir的volume也不行。
挂载一个hostPath的volumes的时候,需要设置挂载方式为read only, 不然存在安全风险。
1
2
3
4
5
6
7
8
9
10
11
12
volumes: - name: test-volume hostPath: path: /data type: Directory 这时定义hostpath的volume,定义的时候没有readonly选项。 volumeMounts: - name: test-volume mountPath: /test-volume readOnly: true
在官方文档中有这么一段话
1
2
3
4
5
6
https://kubernetes.io/docs/concepts/storage/volumes/#hostpath Warning: HostPath volumes present many security risks, and it is a best practice to avoid the use of HostPaths when possible. When a HostPath volume must be used, it should be scoped to only the required file or directory, and mounted as ReadOnly. If restricting HostPath access to specific directories through AdmissionPolicy, volumeMounts MUST be required to use readOnly mounts for the policy to be effective.
简单讲就是在强调你在挂载hostpath的volume的时候必须设置readOnly。
这是因为,已经证明存在一些方法来绕过约束。比如我配置了hostPath不能访问A目录,但是我可以通过挂载B目录间接访问A目录;或者我配置了hostPath只能访问A目录,但是我可以通过A目录,间接访问到B目录。是不是很神奇。
这部分内容比较独立,并且偏向于攻击,也没有考到,感兴趣的可以跳到k8s中的hostPath的安全隐患 查看。
最后祝大家考试顺利~
k8s中的危险权限 树莓派搭建k8s集群 k8s中的hostPath的安全隐患 k8s中的PodSecurityPolicy CKA prepare CKAD prepare CKS prepare cks-challenge-series/ImagePolicyWebhook kubernetes admission-controllers imagepolicywebhook CKS Exam Series #4 Crash that Apiserver ! kubernetes Pod Lifecycle Kubernetes best practices: terminating with grace 3 simple tricks for smaller Docker images Kubernetes Runtime Class gvisor Installation kubernetes volume hostpath kubernetes authentication-flow kubernetes Authenticating Kubernetes Restrict a Container’s Access to Resources with AppArmor GateKeeperV3 deploy file OPA Tutorial Securing Kubernetes Clusters by Eliminating Risky Permissions Inside Kubernetes RBAC advocacy site for Kubernetes RBAC kubernetes changelog kubernetes Dashboard arguments Dashboard deploy file Dashboard Creating sample user kubernetes Deploying the Dashboard UI kubernetes Configure the Aggregation Layer Building Kubernetes Aggregated API Server kubernetes Manage TLS Certificates in a Cluster kubernetes TLS secrets kubernetes TLS ingress Create an HTTPS ingress controller and use your own TLS certificates on Azure Kubernetes Service kubernetes Signers kubernetes Normal user kubernetes Pod Security Admission kubernetes Restrict a Container’s Syscalls with seccomp kubernetes Feature Gates kubernetes Enable seccomp for all workloads with a new v1.22 alpha feature kubernetes Use the Default Service Account to access the API server kubernetes Garbage collection of failed Pods kube-apiserver command line parameter kubernetes Encrypting Secret Data at Rest kubernetes Auditing Kubernetes’ AlwaysPullImages Admission Control - the Importance, Implementation, and Security Vulnerability in its Absence kubernetes AlwaysPullImages kubernetes imagePullSecrets kubernetes admission-control eventratelimit kubernetes Anonymous requests kubernetes Kubelet Configuration (v1beta) kubernetes Webhook Mode CIS下载网站 Kubelet 无法启动 Running kube-bench kube-bench Installation metrics server deploy file ingress-nginx deploy file github ingress-gce repo github ingress-nginx repo anonymous-auth discuss in github kubernetes anonymous-auth discuss in github kubeadm gadgets list installing-kubectl-gadget krew installing sysdig github Sysdig Onprem Configuration Parameters sysdigcloud releases Sysdig Onprem Configuration Values Falco Rules Falco Examples Falco Running Falco Install anchore/grype anchore/syft aquasecurity/trivy trivy installation controlplaneio/kubesec 一文看懂 Container Runtime